Changing IP Address
So you set up a server but want a Custom, personalized, easy to remember IP? You've come to the right place!
With Custom IP Address we also get rid of the port, so no need to remember that anymore!
There are a few different ways, both Free and Paid. I will be guiding you through all of them.
Subdomain creators
One of the simplest ways of getting Custom IP Address is by using Subdomain creators. Also, have I mentioned they are Free? 
But what the hell is a Subdomain?
A subdomain is a domain of another domain. Okay..., bear with me.
To be able to communicate and identify one another, computers use IP Addresses. As they are hard to remember, we have Domains, human-readable strings. They are used to look-up DNS (the phone book of the Internet) to get server's IP Address.
Domains consist of Domain name and Top-Level Domain (TLD), separated by . (full stop).
[Domain_name].[TLD]
Domain examples
google.com, wikipedia.org, freemc.host, and so on...
If we take Subdomain, as a domain of another domain, we would have Subdomain prefix and another domain separated by . (full stop).
[Subdomain_prefix].[Domain_name].[TLD]
Subdomain examples
en.wikipedia.org, mail.google.com, free5.freemc.host, ...
I hope that makes it a little bit more clear about what we are going to do.
So first, make sure that your server is up and running! Subdomain creators will ping your server to make sure you entered the right details. It's a good thing in case you made a mistake.
On FreeMC.Host Panel, Go into your servers Console, then from Sidebar Expand Configuration and click on Allocation Settings. Take note of IP Address and Port.
If you are a Patreon and have more ports on your server, make sure to copy from the row where "Primary" Green button is!

Now, we need to pick what Subdomain creator to use. This is up to your personal preference depending on how you would like your new IP to look. Different subdomain creators offer different domains for us to choose from. If we know that our Subdomain prefix can be anything, but the domain has to be what Subdomain creators offer, with knowledge obtained from above, we can see how our new IP will look.
https://mc-srv.com/create
mc-srv.com, mcalias.com, gamename.net, hosthorde.net
https://shockbyte.com/subdomain-creator
mc-server.pro, minecraft-server.pro, shockbyte.pro
http://sparkedhost.com/subdomain
mysrv.us, sparkedservers.us
https://ramshard.com/subdomain/creator
mcpocket.net, pocket-server.net, ramshard.net
Okay, you choose one, right?
I will choose a random one for this tutorial.
Now that we have done that...
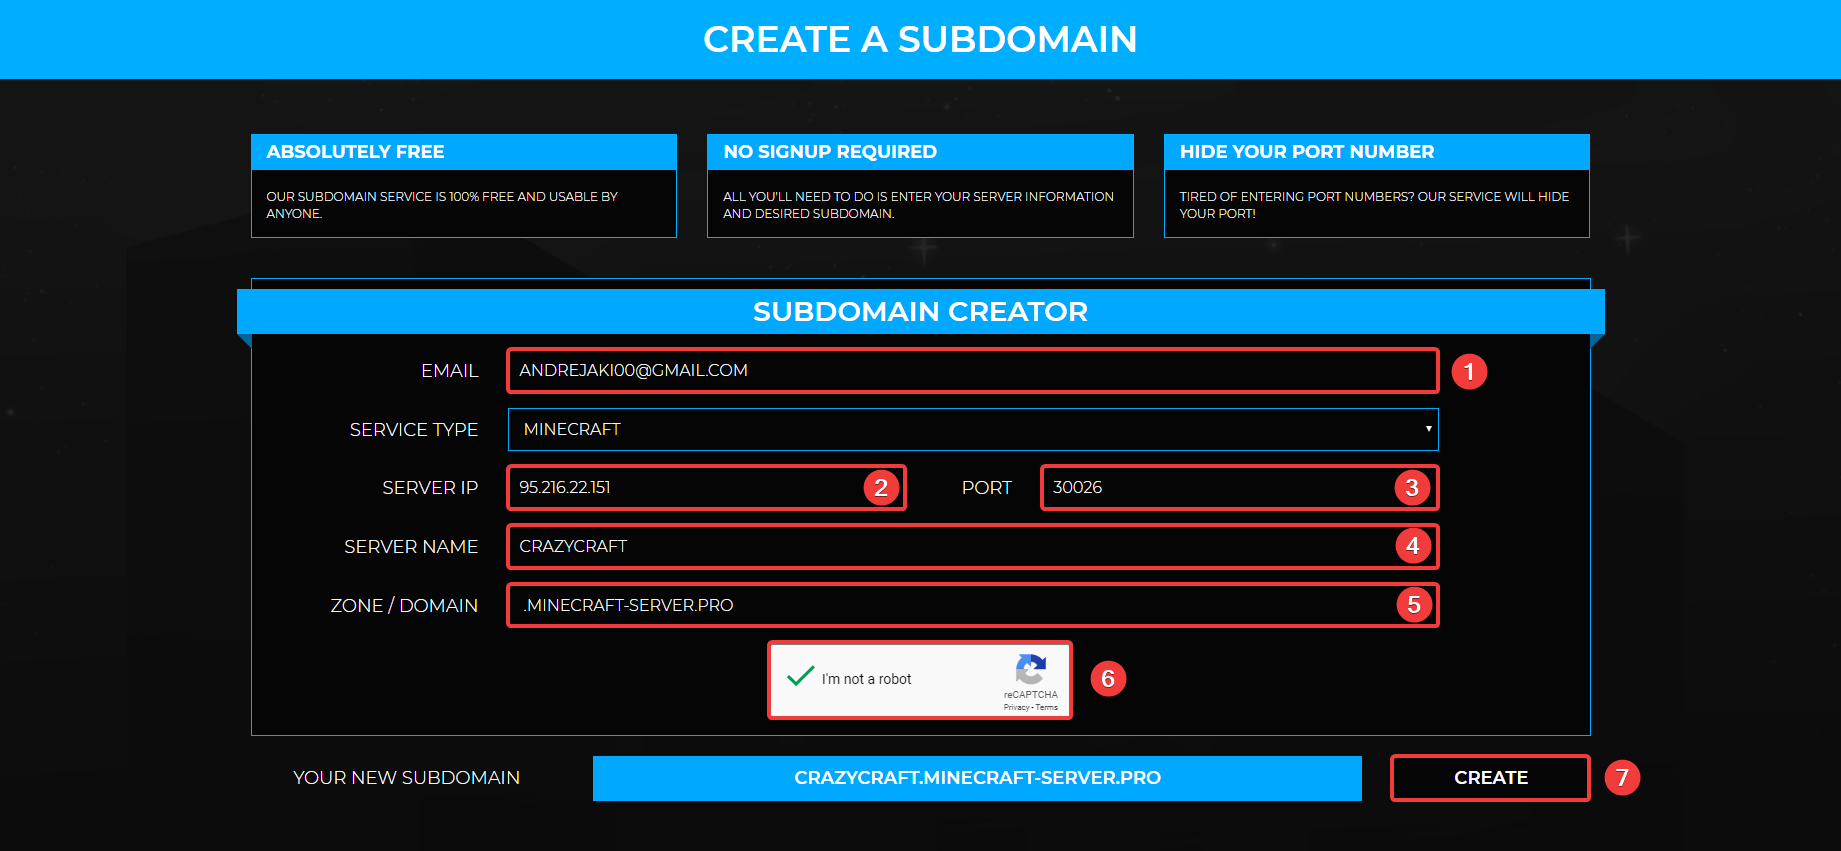
If required, enter any email address you have access to. Some pages ask you to confirm subdomain by confirming your email!
Enter Server IP and Port from Allocation Settings page we saw earlier.
Pick your Subdomain prefix (Server name) and Domain.
If there is, solve Captcha.
Create! 
Note
Depending on a situation, your Subdomain might need some time to activate. If it's not working, wait up to an hour. If it's still not working after you waited, you may have messed something up! 
The best way to make sure your IP is working is by Minecraft Server Status website.
Domain registry
For this method, we will be using Domains. That means that you would need to have a registered domain first.
Getting a domain
If you don't have a domain already, you can register it on any domain registry. I recommend using Namecheap, as I also use it for my domains.
Unlike Subdomains, domains are not free! However, there are a few exceptions!
There is a website called Freenom that allows you to register .tk, .ga, .ml, .cf, .gq domains for free. Of course, if you register them for 12 months. I had registered many domains on Freenom. It worked great. After a domain expires, you can just renew it and it works as before!
Unfortunately, some people are unable to register domains on Freenom due to geographical restrictions. Using a VPN or Proxy to bypass them is also not always successful.
When you have registered your domain name, we can now set it up as our Server's IP Address. For this tutorial, I will be using my Domain name from NameCheap.
When we have our domain, we can also have subdomains on it. When the IP Address is prefixed with play., mc., ... That is a subdomain and we can also do that!
As I am not able to cover all Domain registries, some don't even support technique required to change our Server's IP Address and changes on our domain on them can take a lot of time, I will show you Cloudflare. A Free DNS Management Service. It's easy to use and super fast!
All right then!
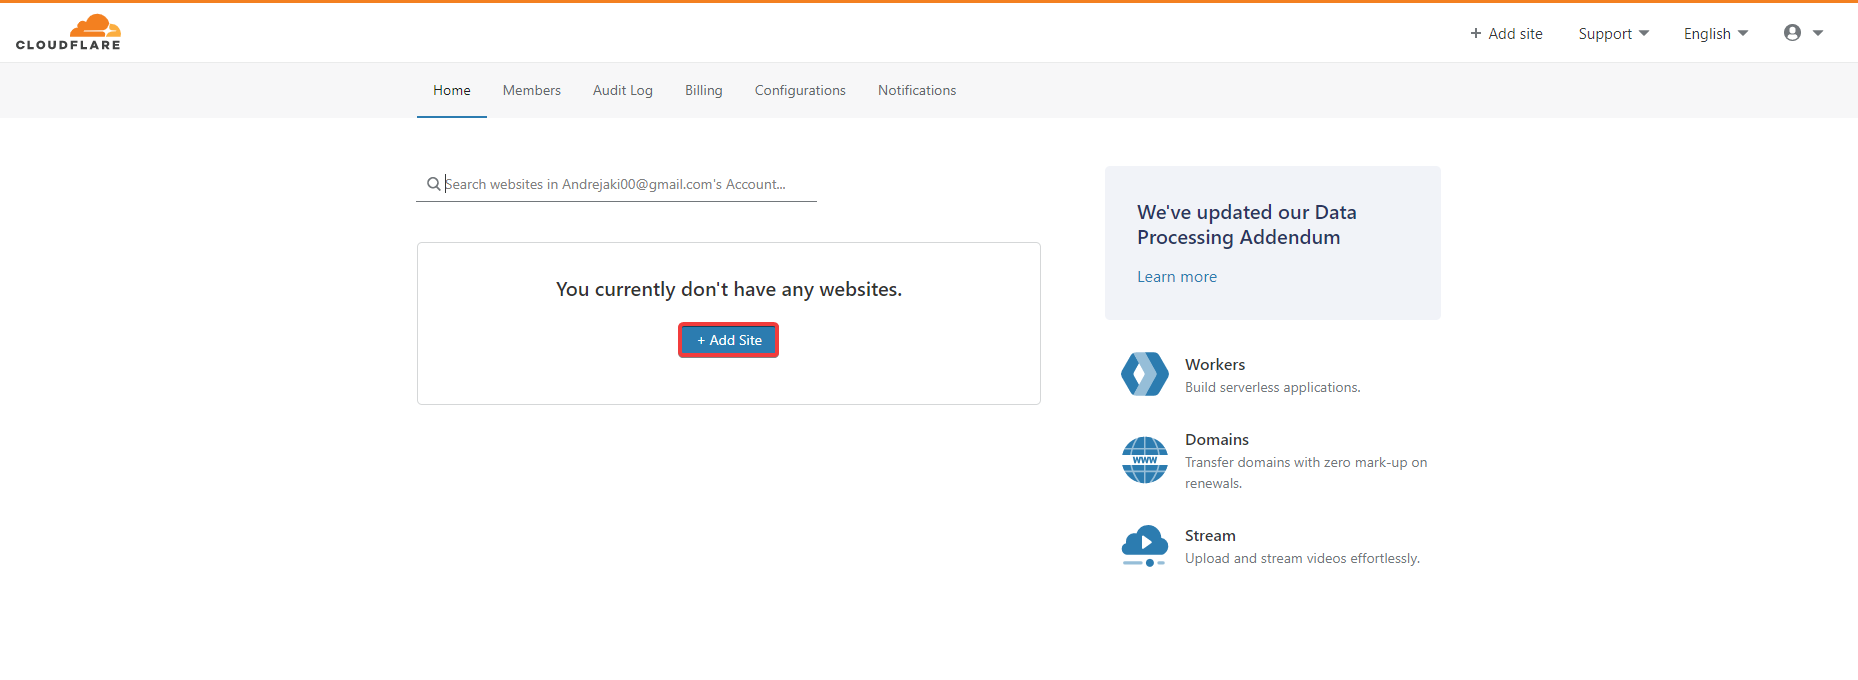
Navigate to https://dash.cloudflare.com/, Sign up for an account if you don't have it.
Click the Add Site button.
Enter your registered domain and confirm with Add Site button.

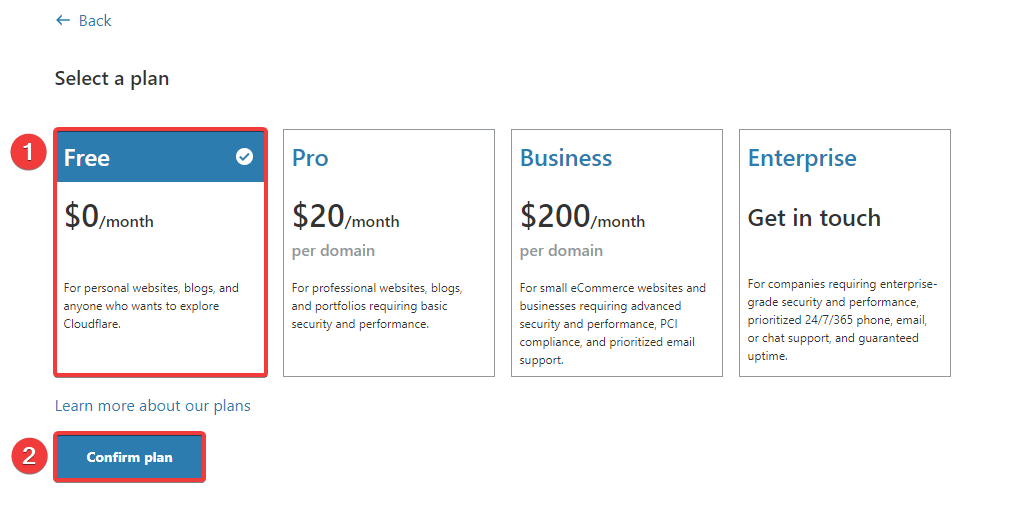
Select Free plan and Confirm plan.
On the next, page click on the dropdown list where it says "A" by default, and select "SRV" instead. This is our DNS Record type.

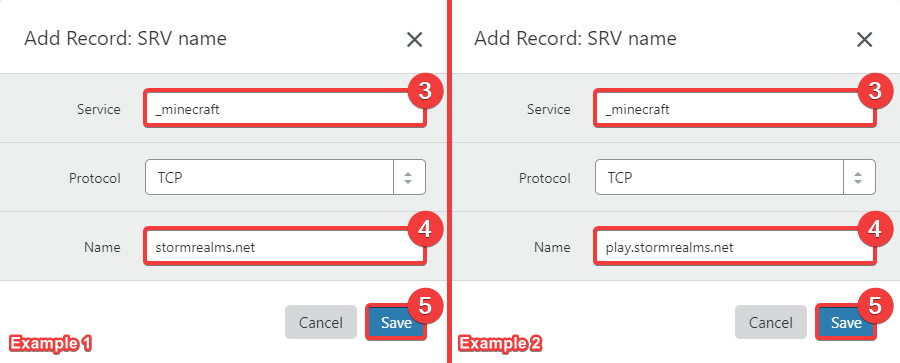
You will get this pop-up window. (If you don't, just click on "Name" input field next to the dropdown list)
In Service, type _minecraft
As Protocol, leave TCP
For the Name, this will be your new IP Address. If you would like your IP to be prefixed with play., mc., or anything else, you do that here.
For my domain example, if I prefixed it with play., so it will be play.stormrealms.net, that will be my new IP address. If you don't want to, you can just leave it as is, so your IP Address will be, like it says, stormrealms.net for example. Once done, Click Save.
Tip
You can also add another record with a different prefix. When we add this record, just click on the "Name" field next to the dropdown list and you can repeat these steps.
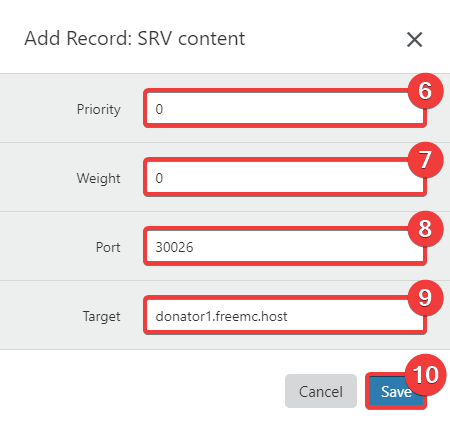
Set Priority and Weight to 0.
On FreeMC.Host Panel, there is your server's IP Address under "Connection". For my server, it is donator1.freemc.host:30026. This IP has two parts, Hostname (donator1.freemc.host) and Port (30026). They are separated by ":" (colon).
Set Port to your server's port and Target to your server's Hostname.
Once again, Click Save!
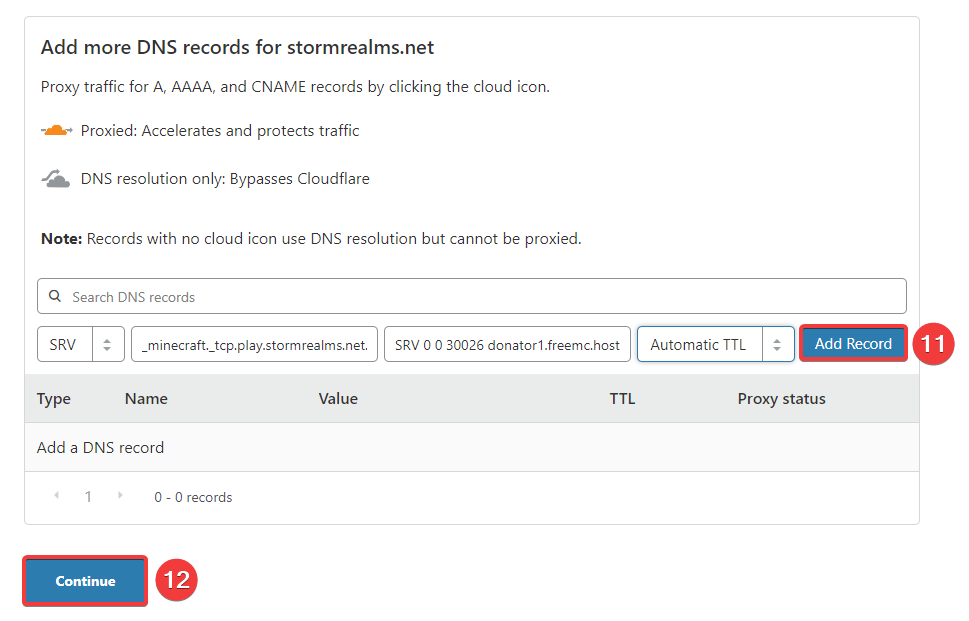
And now Click Add Record!
If you want to add another record to your IP address, now it's a good time to do so.
Now that we Added our Record(s), let's continue by clicking the Continue button.
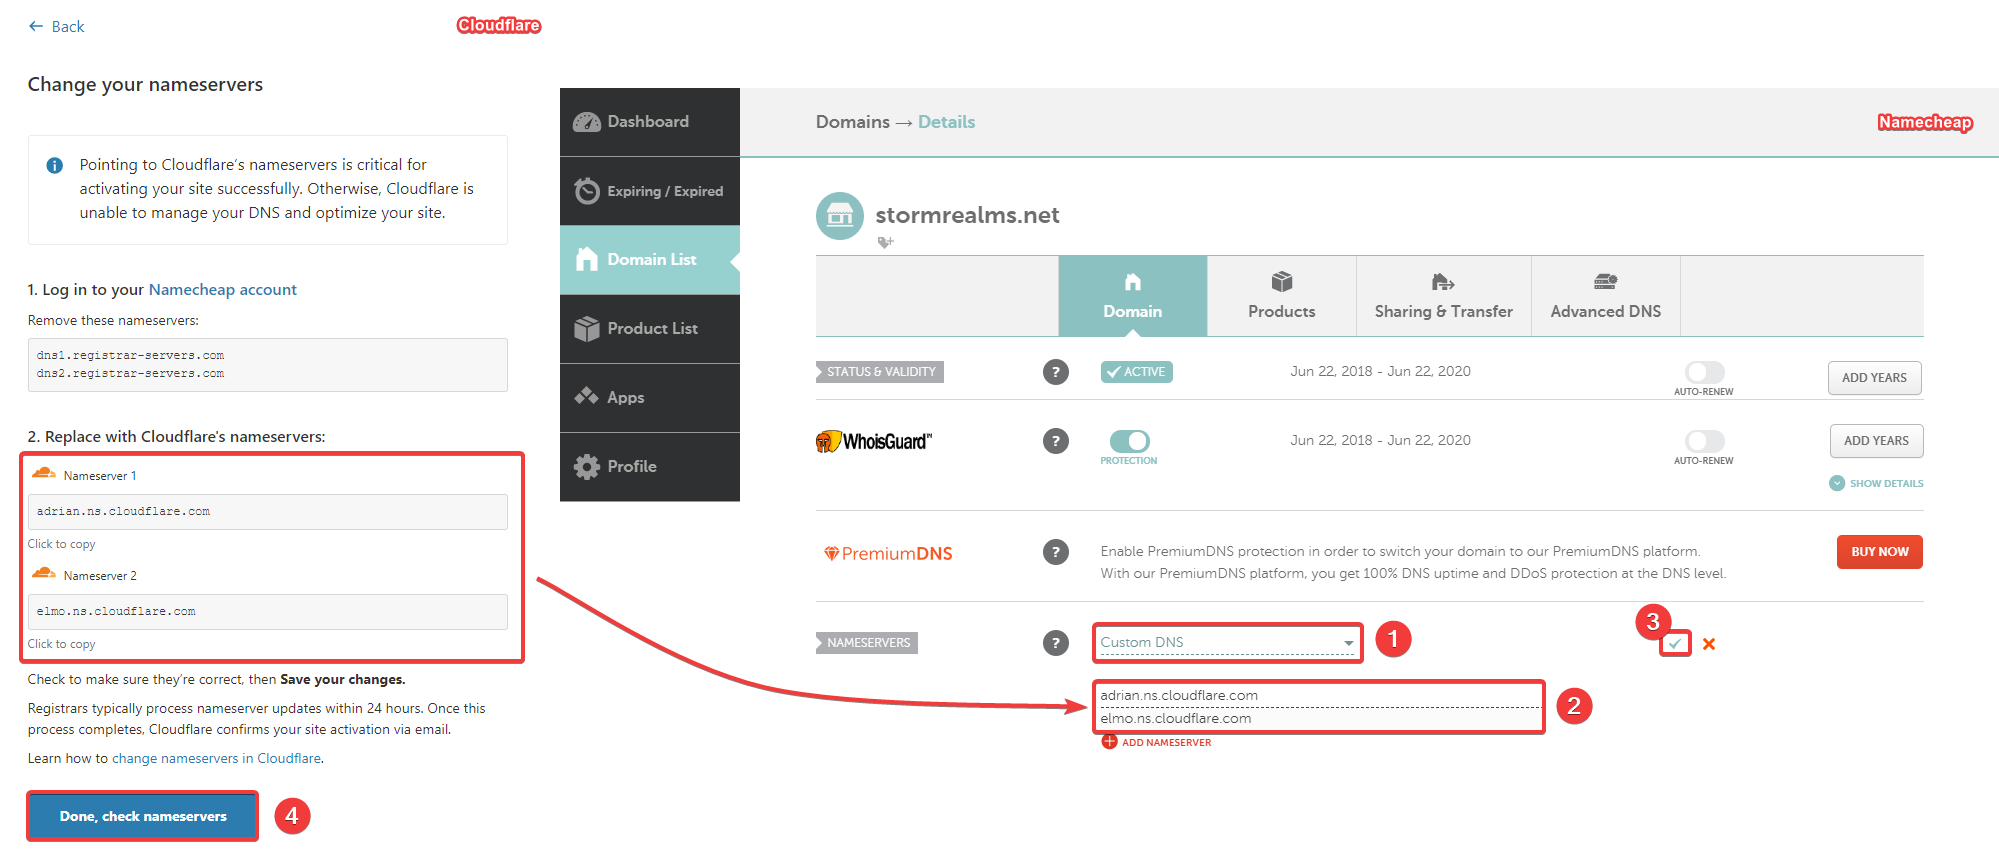
Finally, to finish, we would have to change our Domain's nameservers as instructed by Cloudflare.
So go ahead and Google how to change nameservers domain register you use.
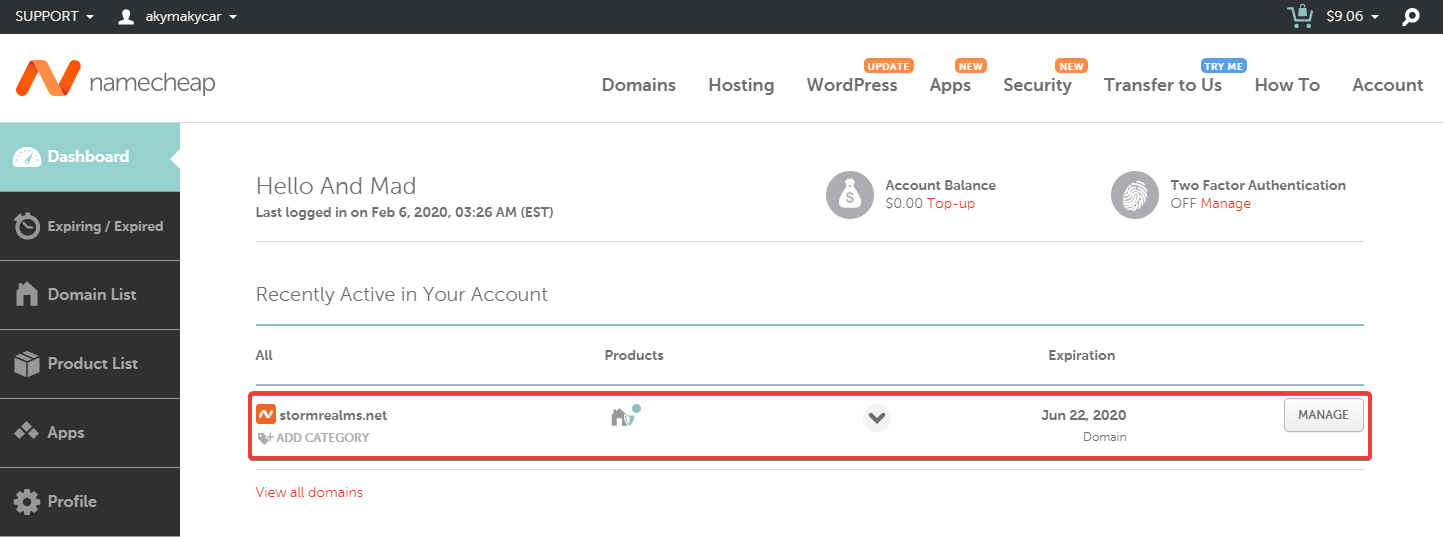
I use Namecheap, so this is what I will do.
I will log in into my Namecheap account and click Manage next to my domain. Under the Nameservers section, instead of "Namecheap BasicDNS" I am going to select "Custom DNS". Now I can copy Nameservers given on Cloudflare and paste then on Namecheap.
Now that I have done that, I will click Done, check my nameservers back on Cloudflare!
If you get the same message after you click the button, even if you have changed nameservers, don't worry! The same happens to me. I just wait a few seconds and reload the page. Now I am greeted with this message.

It can take up to an hour for you. You can safely close the page. Once activated, you will receive an email that your shiny new IP is ready for use! 
Note
Even if already active, depending on your Internet Service Provider, you might not be able to use new IP right away, even if everything is set up correctly. The best way to make sure your IP is working is by Minecraft Server Status website.
Info
If you want to make some adjustments to your IP, add additional prefixes or remove existing ones, open up Cloudflare Dashboard, click on your Domain and Select DNS page.