Look at the Panel
FreeMC.Host Panel is Powered by Free and Open-Source Pterodactyl Panel.
On Panel, you can control your server - view Console output and send Commands, Manage Files and more!
My Servers
This is the Home page of the Panel. On My Servers page, you can see all the servers you own and Servers you have access to.
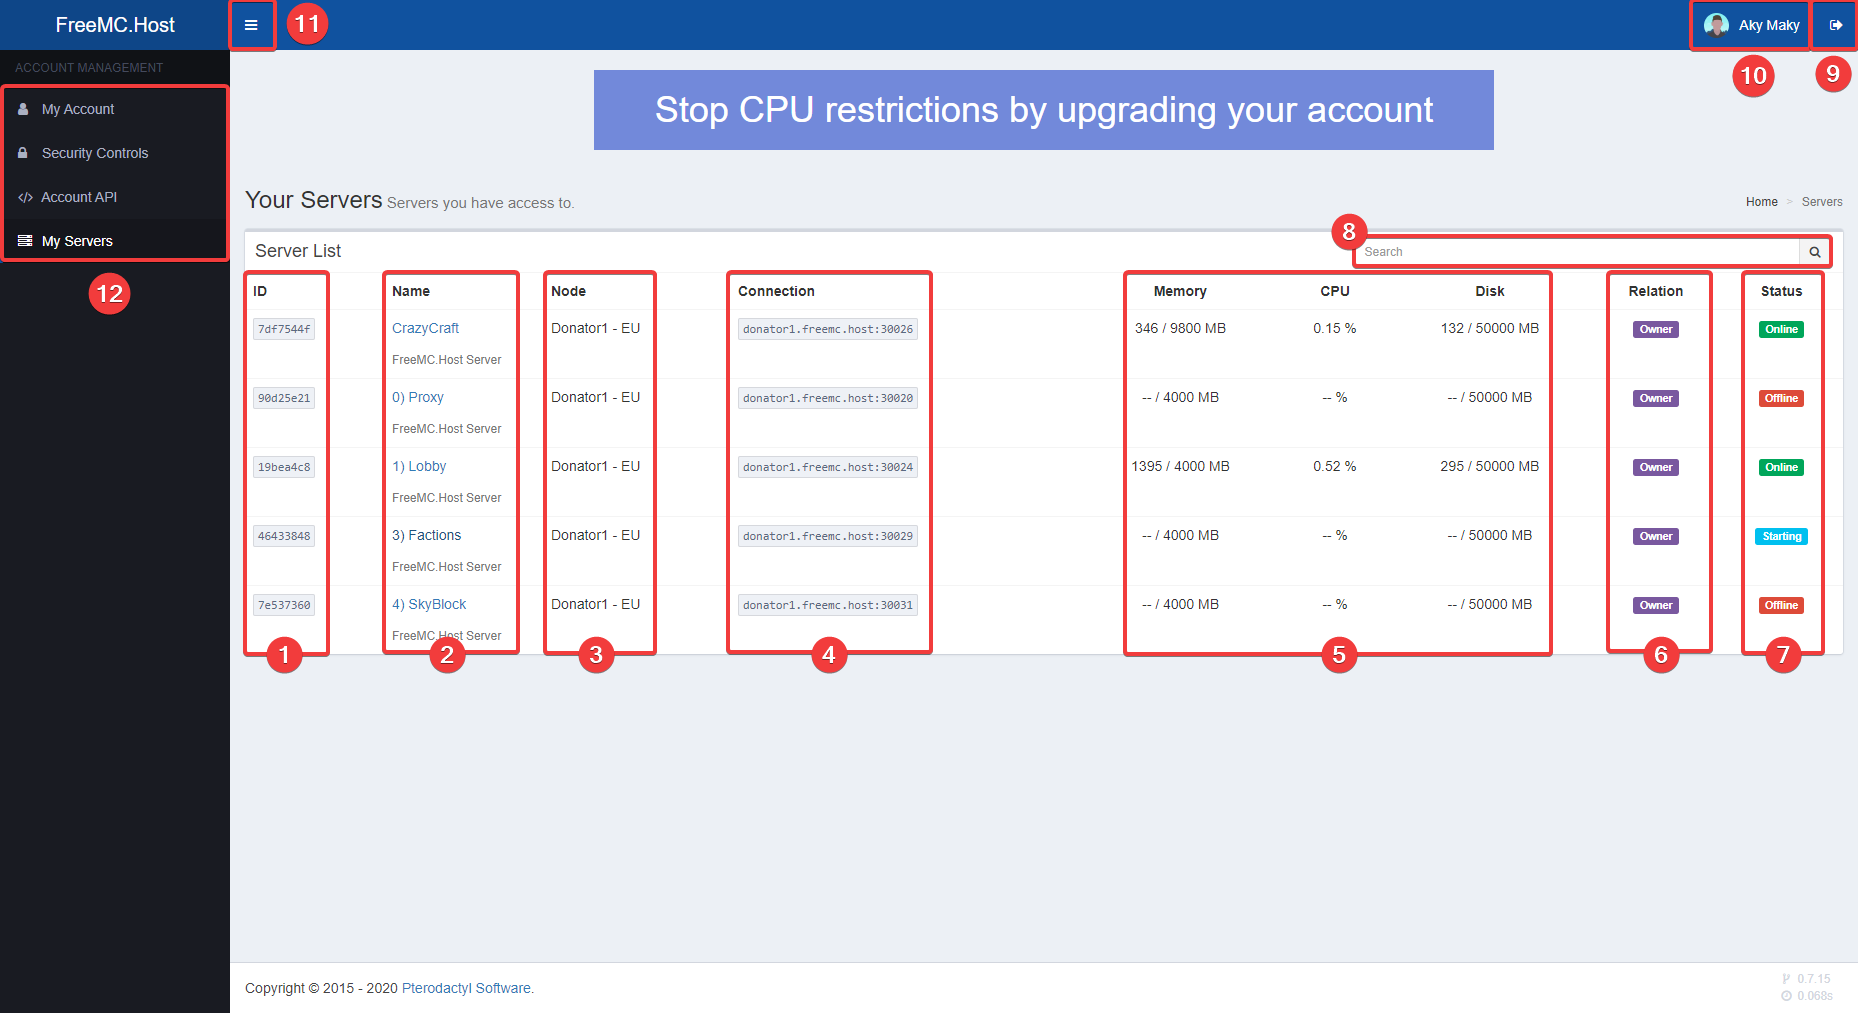
1 - Identifier (ID) is a unique string of characters to your servers. Make sure to provide it when asking for help about your server in the support tickets.
2 - This is your server's name. By clicking on it you will be sent to the server's Console page. Name can be changed later on in Configuration.
3 - Name and location of machine used to run Minecraft server on.
4 - Server's IP Address.
5 - Resource usage and limitations.
6 - Your relation with the server. Can be Owner or Subuser (explanation later on this page).
7 - Current server status. Can be Online, Starting, Stopping, Offline, Installing or Suspended.
Installing - the server has just been created and it is getting prepared for the first use.
Suspended - the server is suspended due to breaking services ToS. If your server is suspended, open a support ticket on FreeMC Discord server to get solved.
8 - Search can be used to quickly lookup a server based on its ID, Name, Node or even Owner's username.
9 - Logout button.
10 - Shows the name of currently logged in user. Click to open "My Account" settings page.
11 - Button to toggle sidebar mini-mode.
12 - Settings page links ("My Account", "Security controls", "Account API") and link to "My Servers" page (current page).
Server pages
Server Console
By clicking on the Server you will get to the Server Console page.
Here you can view Console Output, Send Console commands and most importantly, Start, Restart, Stop, Kill (Force Stop) your server.
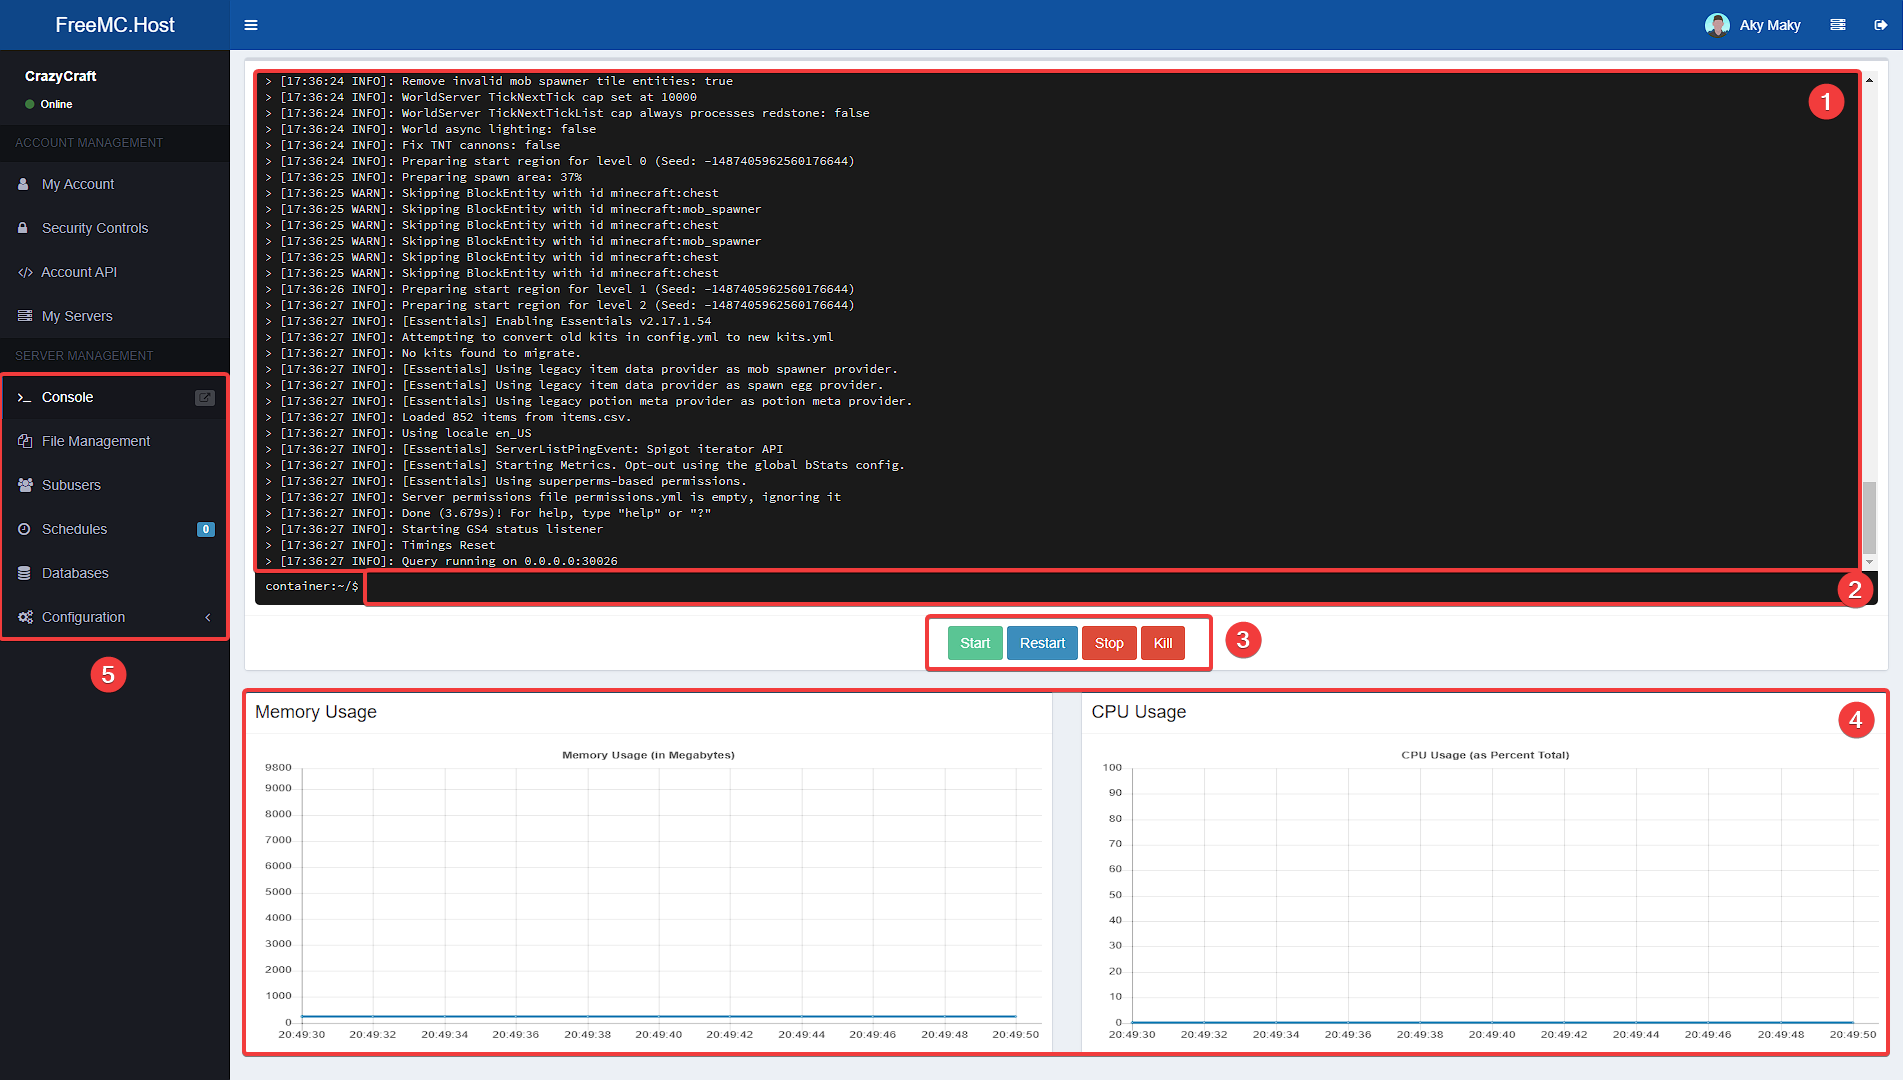
1 - This is the Console output. Everything happening on your Minecraft server will be shown here.
2 - Console input. Here you can type commands to execute on your server (by pressing Enter). When typing commands in Console, do not include / at the start of the command.
3 - Start, Restart, Stop, Kill buttons. Kill will force stop your server, there may be data loss! Use only when mandatory.
4 - Live Memory and CPU usage graphs.
5 - Links to other server control pages.
File Management
In File Management you can manage your server's files. You can Edit them, Create new ones as well as upload them.
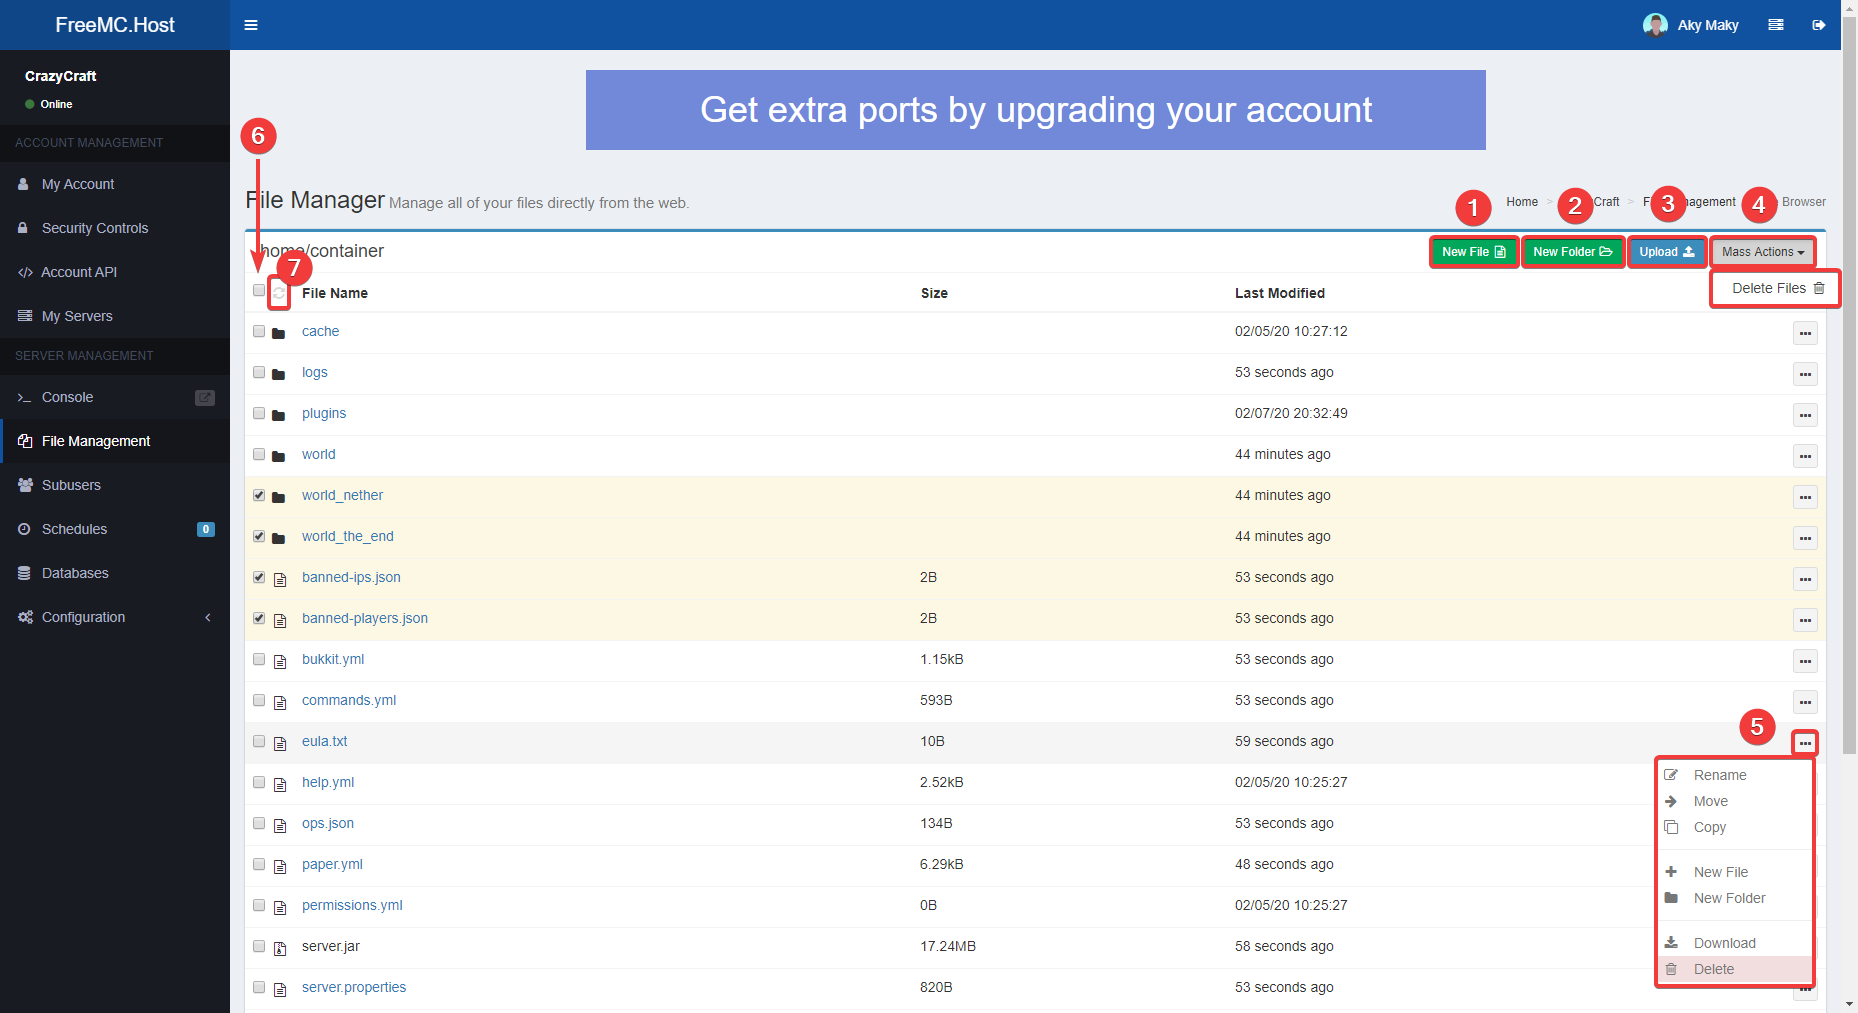
1 - Opens page to create a new file. 2 - Opens Pop-up window to create a new folder. 3 - Opens Upload file dialogue. 4 - Allows you to Delete multiple files and folders at once. 5 - Button to open the context menu to perform actions on files and folders. The menu can also be opened by right-clicking on file/folder. 6 - Checkboxes to select multiple Files and Folders to use with Mass Actions (4). 7 - Refreshes files and folder structure.
Upload files
Upload dialogue
Drag & drop from File Explorer

Drag & drop from browser's Download bar
Editing file
To edit a file, click on its name from File Management. This will open File Editor.
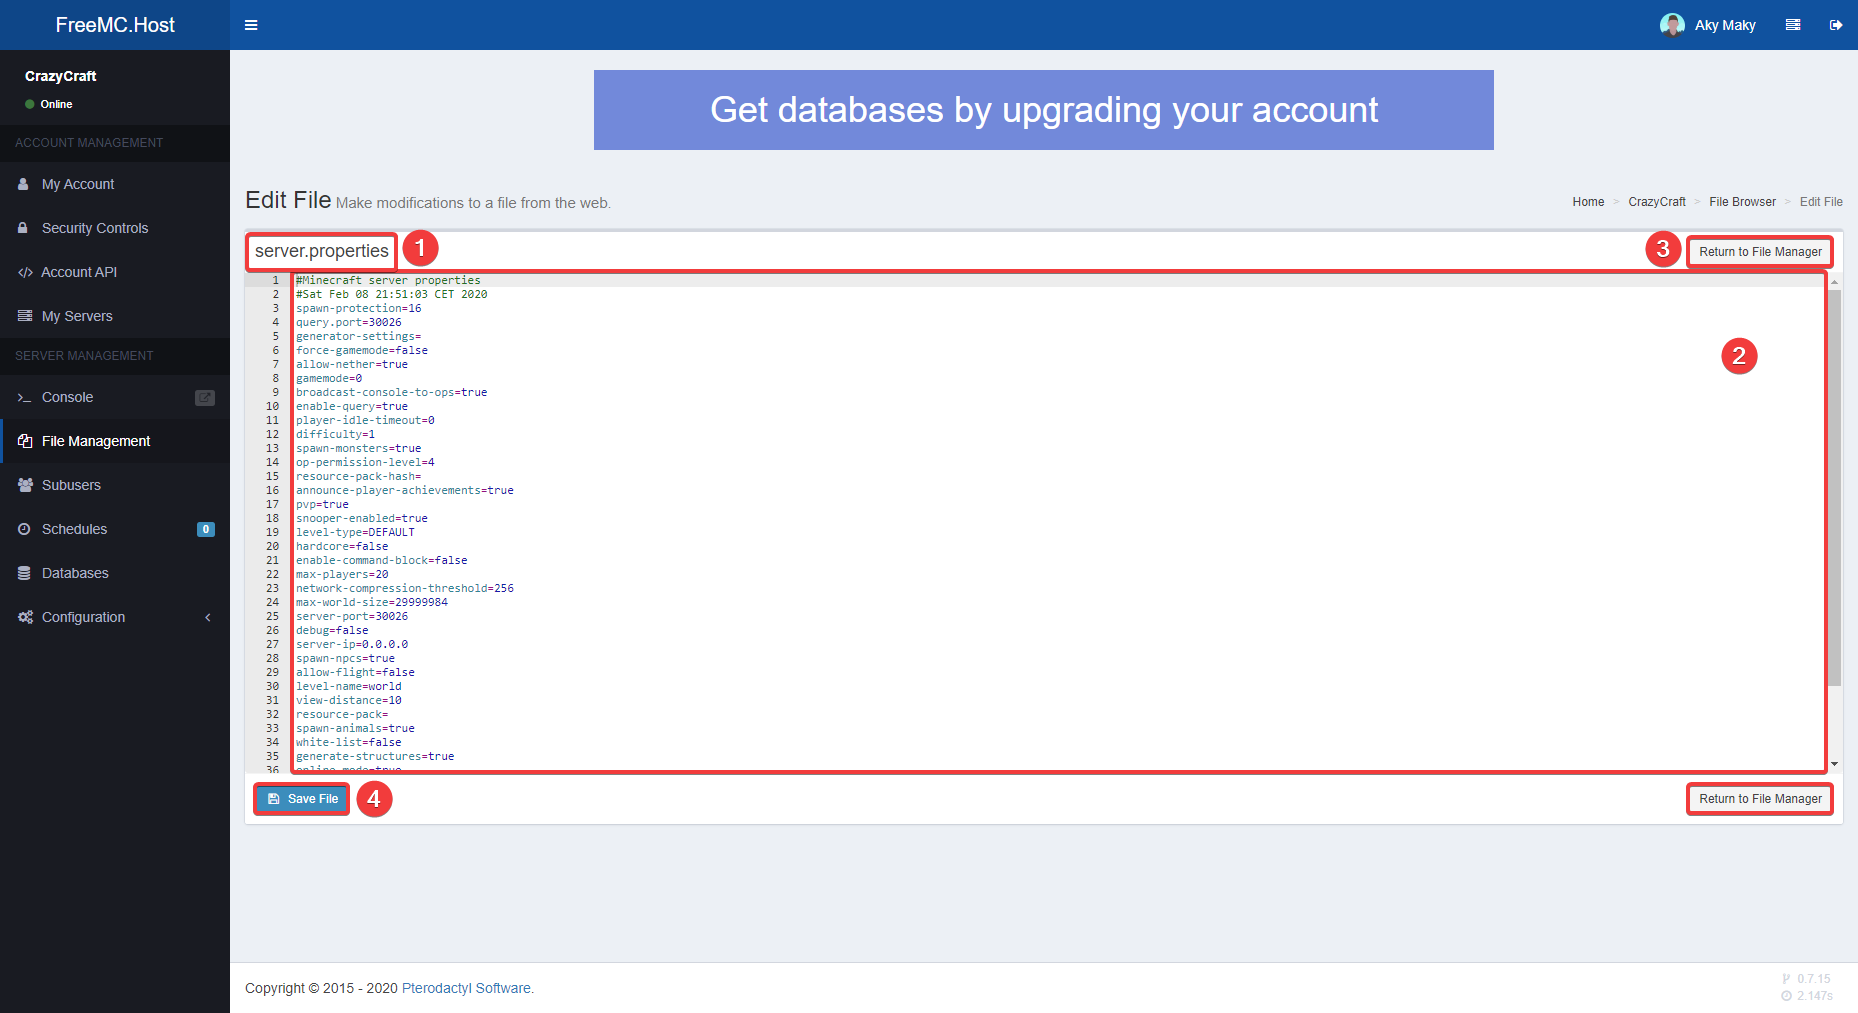
1 - File name. 2 - File contents. 3 - Return to the previous page. 4 - Save the file.
Creating file
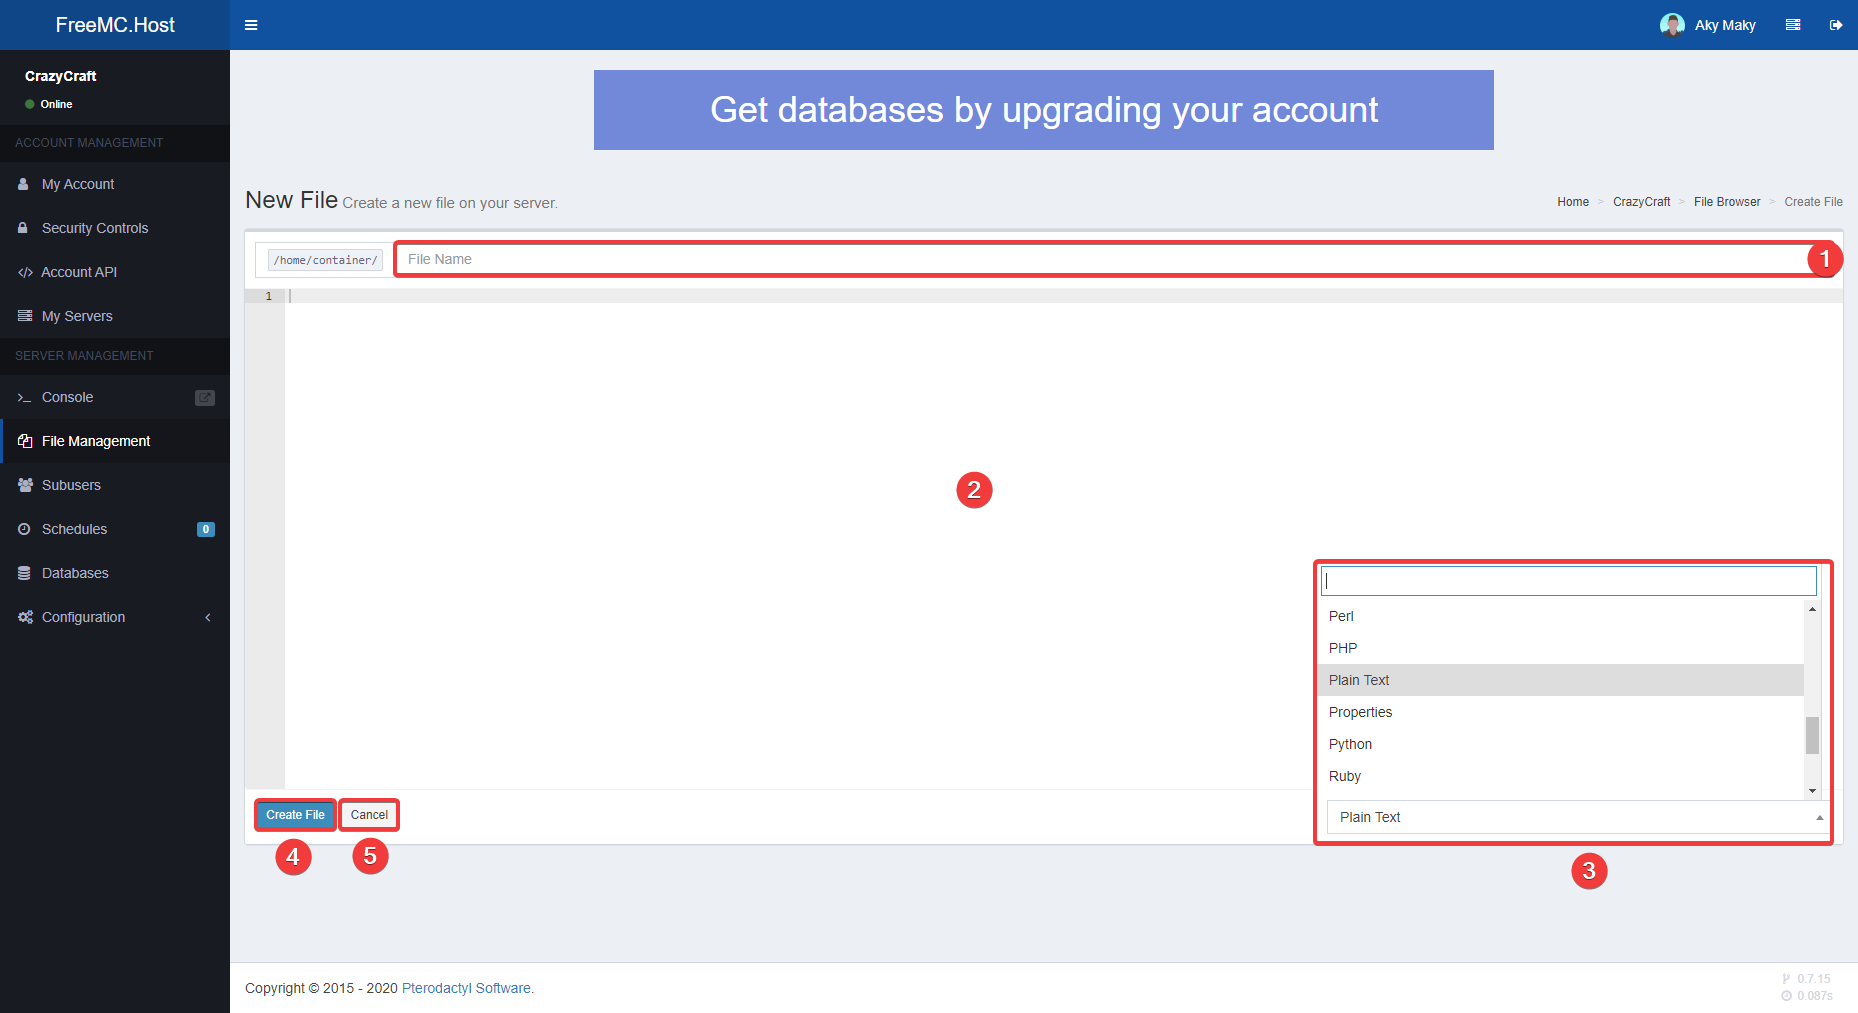
1 - Input new file name. 2 - New file content. 3 - Change file type. 4 - Save the file. 5 - Discard.
Subusers
You can share your server's access with others by making them Subusers. You can give them Full control over the server or only allow some.
On this page, you can view all your server's Subusers, Create new or Edit permissions of existing Subusers.

1 - Create new Subuser.
2 - Edit Subuser's permissions.
3 - Revoke access to the server.
Creating/Editing Subusers
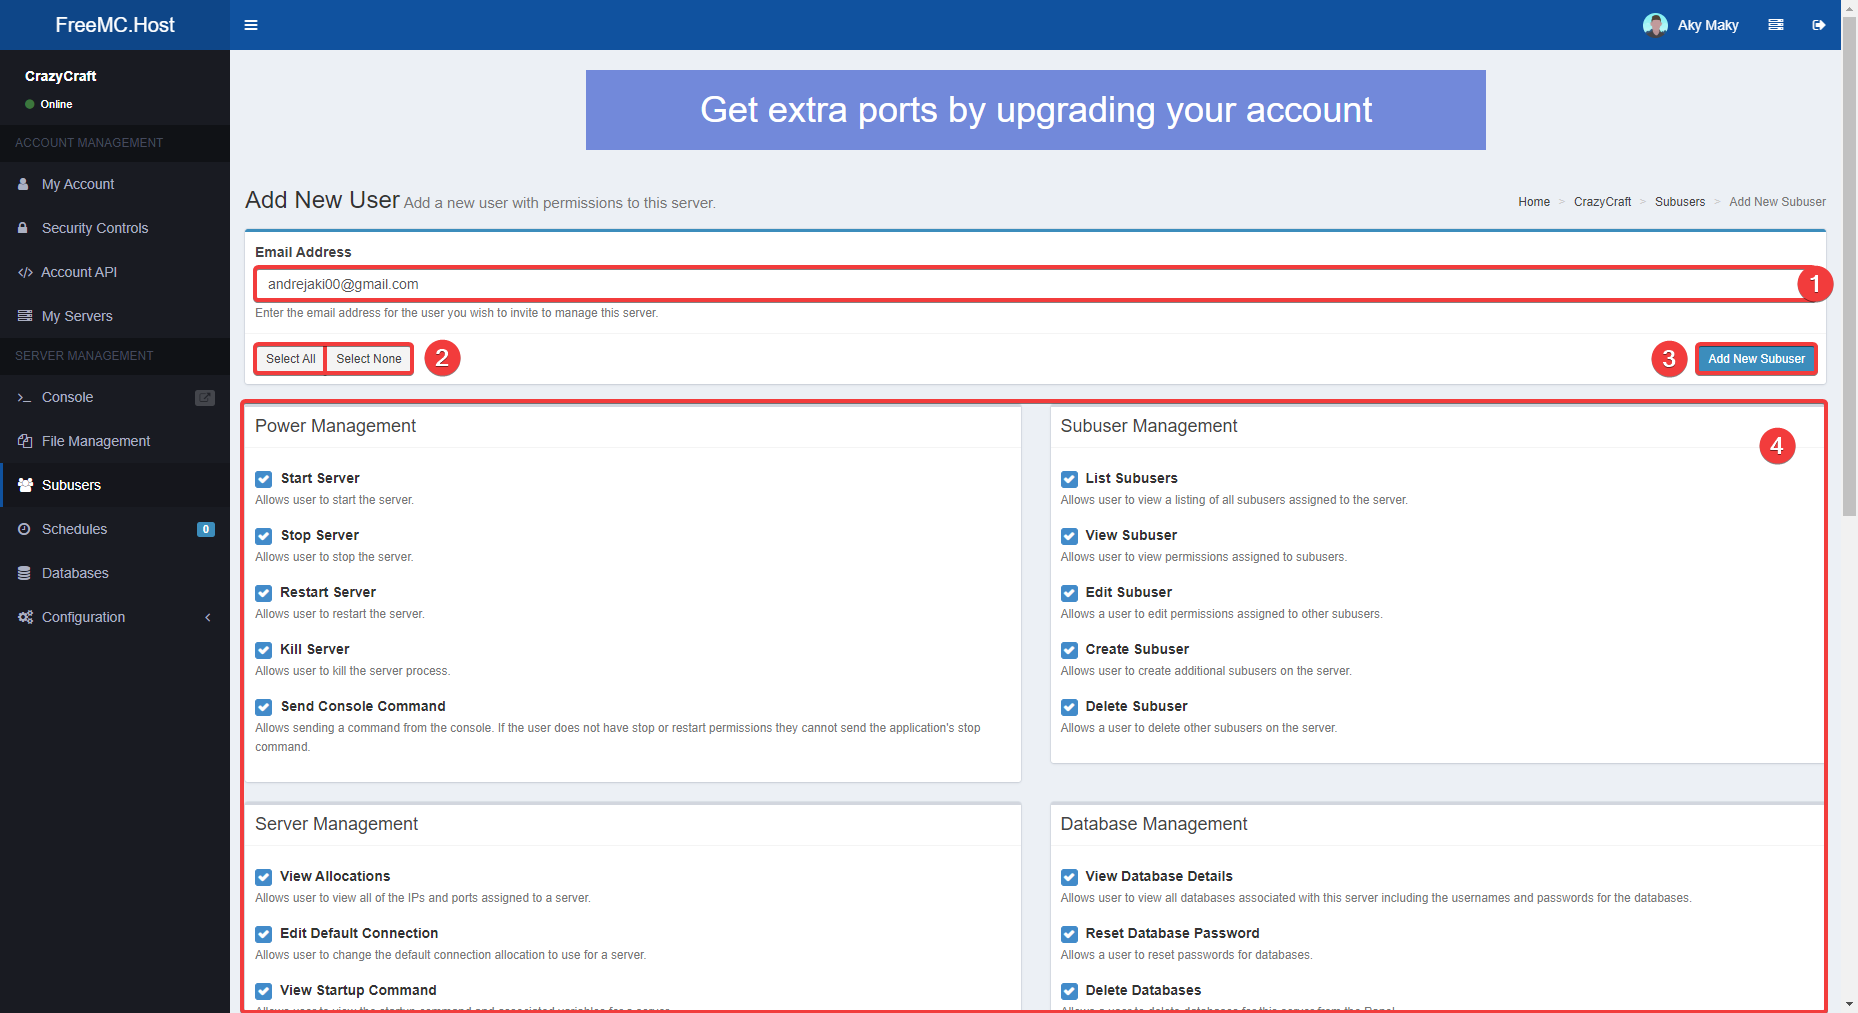
1 - Subuser's email address.
2 - Grant or Deny all Permissions below.
3 - Add new Subuser.
4 - Grant and deny specific permissions.
Schedules
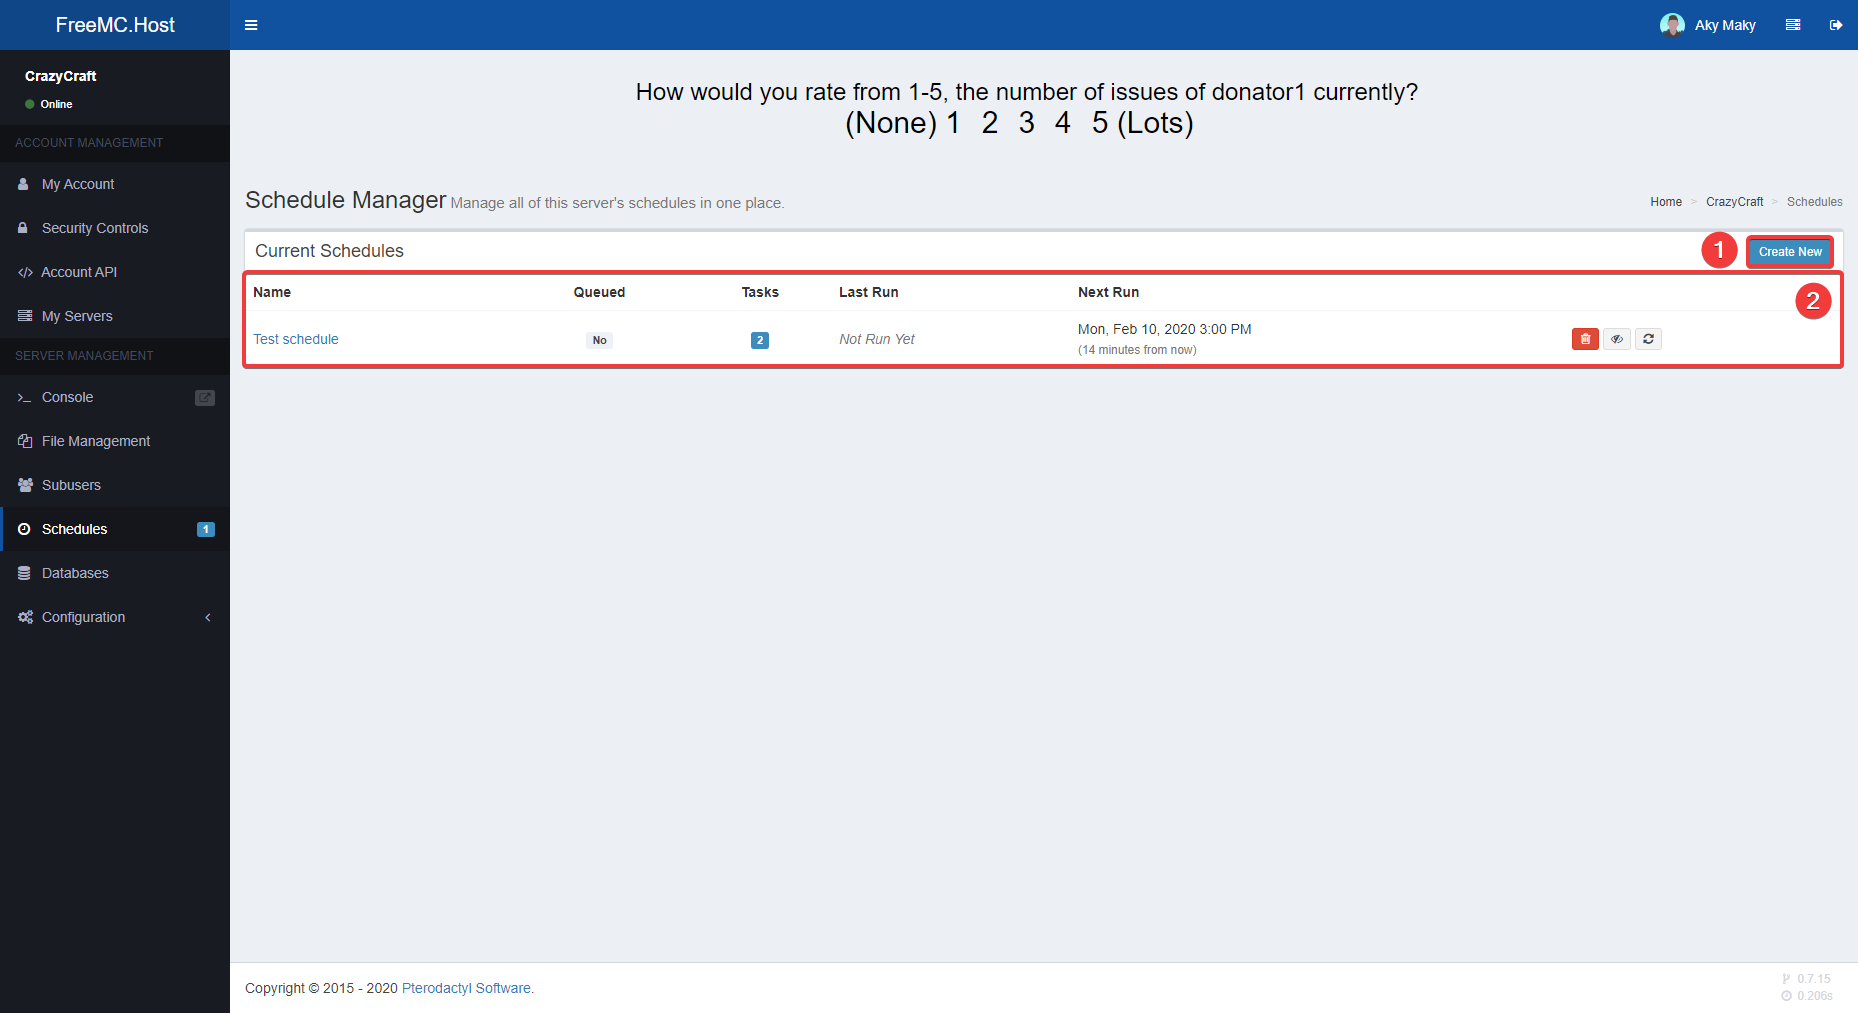
1 - Create new Schedule.
2 - List of Schedules.
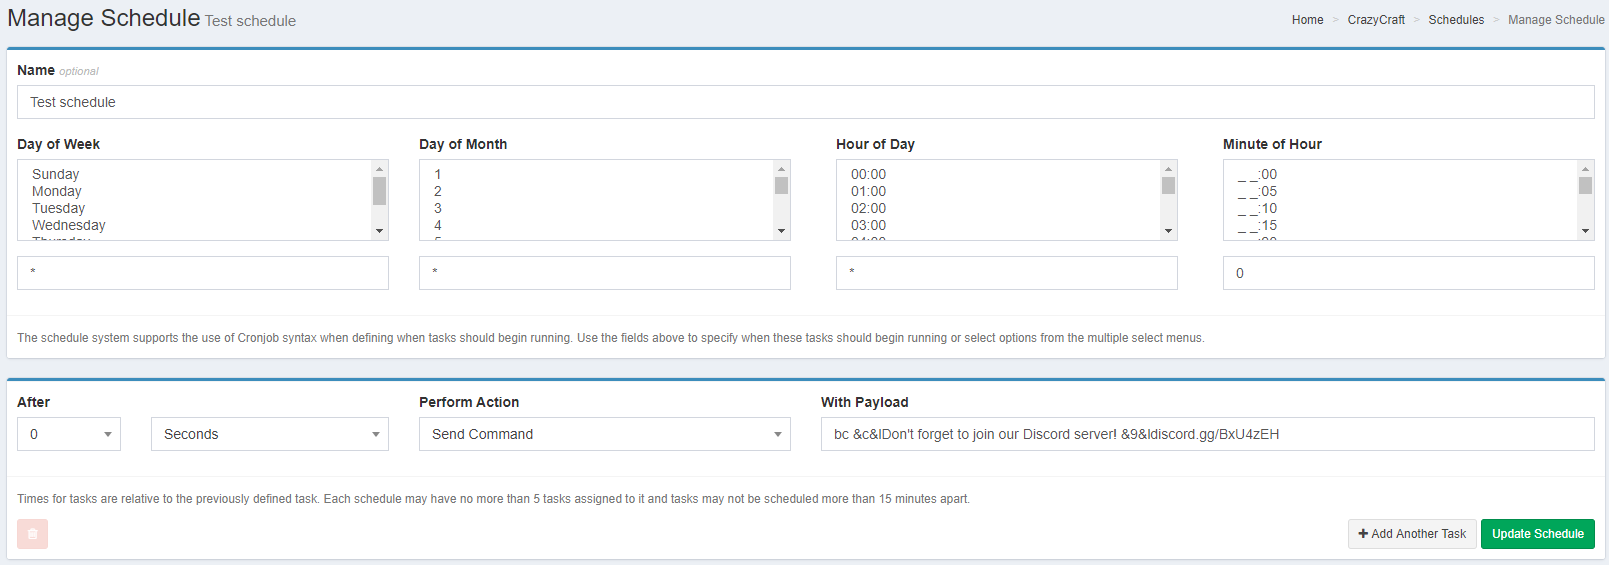
Creating/Editing Schedules
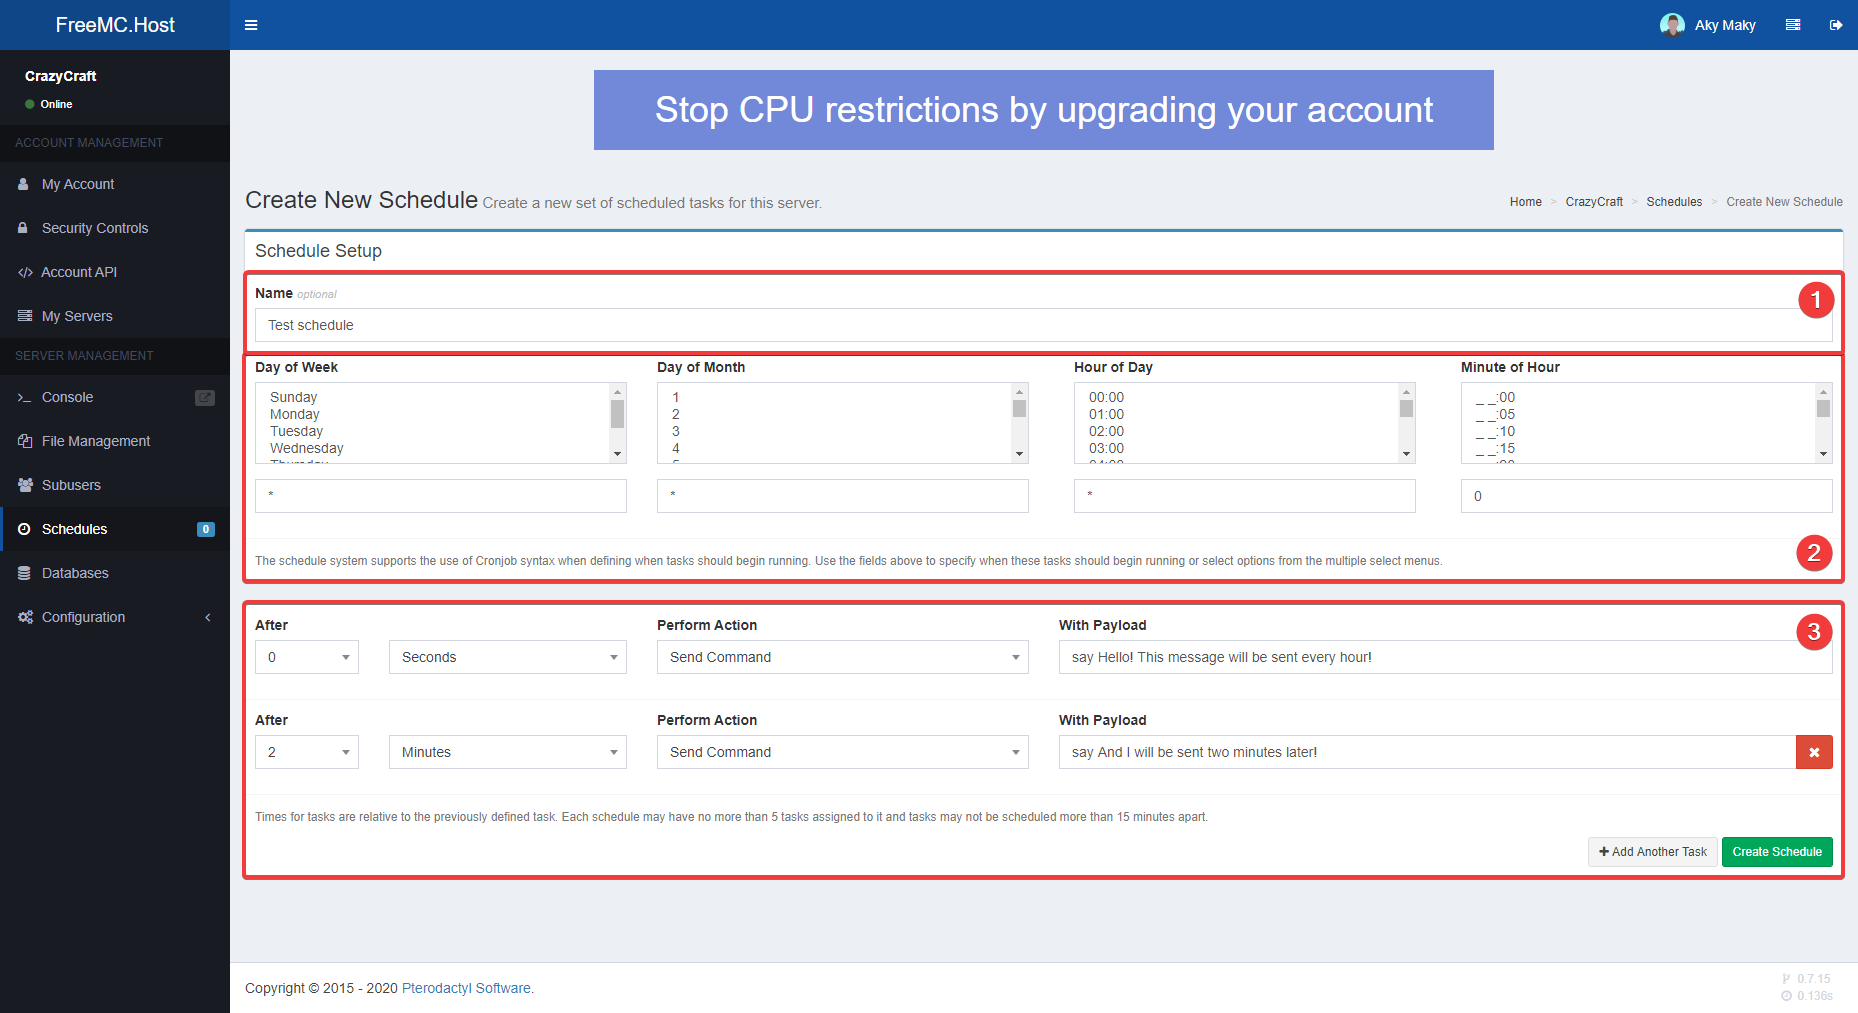
1 - Schedule name.
2 - Time when to run.
3 - Actions to execute.
Note
The panel is using UK's GMT/BST Time Zone! Time at when to run Schedule might not match your local time. Use timeanddate.com for current time in UK.
You can select one Day, Hour or Minute when to run Schedule by selecting items from the list box.
You are also able to select multiple items by holding down Ctrl or Cmd key and selecting items.
Instead of selecting items, you can type them in the text box below. * means for all, while */x means every x units.
In GIF below, I am creating Schedule that will at every 15th minute past hour 0, 1, 2, 3, 7, 8, 9, and 13 of every day of week and month. If that makes sense  .
.

The schedule can have more than one Action. These Actions can execute at the same time of be X seconds/minutes delayed from each other.
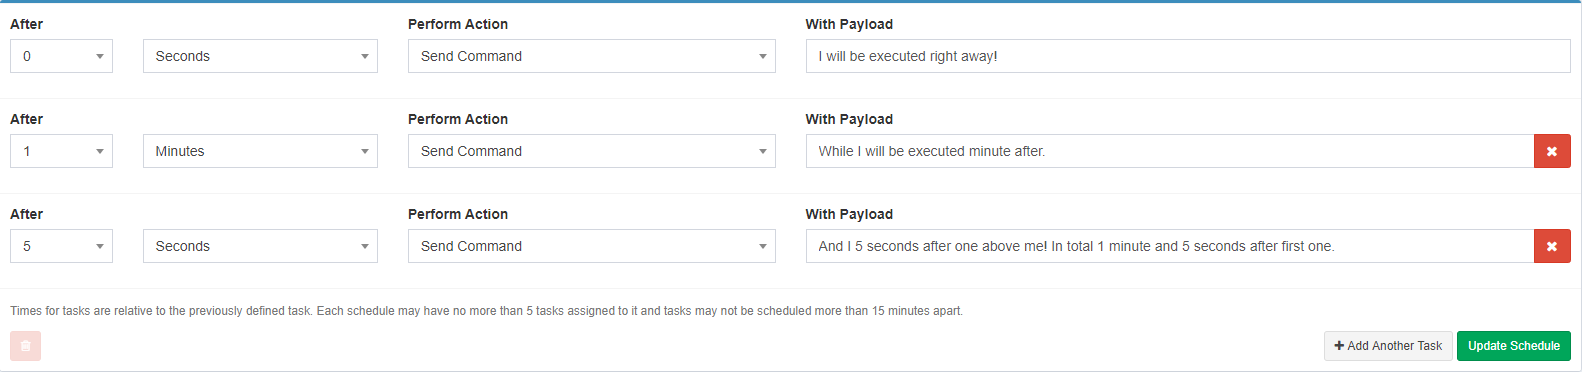
Perform Action is "Send Command" by default. Then Action Payload can be a command that will be executed in the Console. Just like in the Console, commands do not have / at the start!
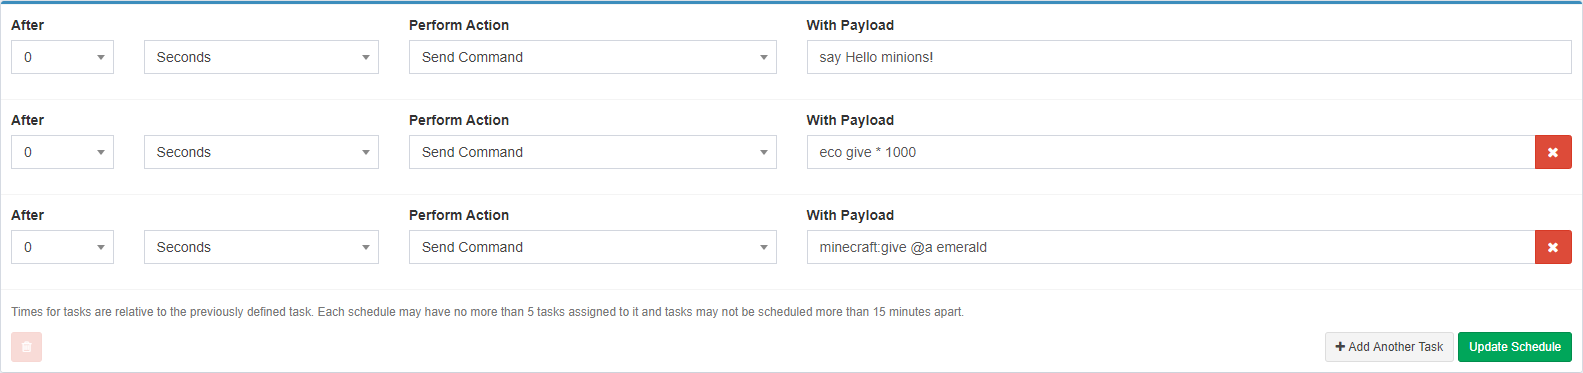
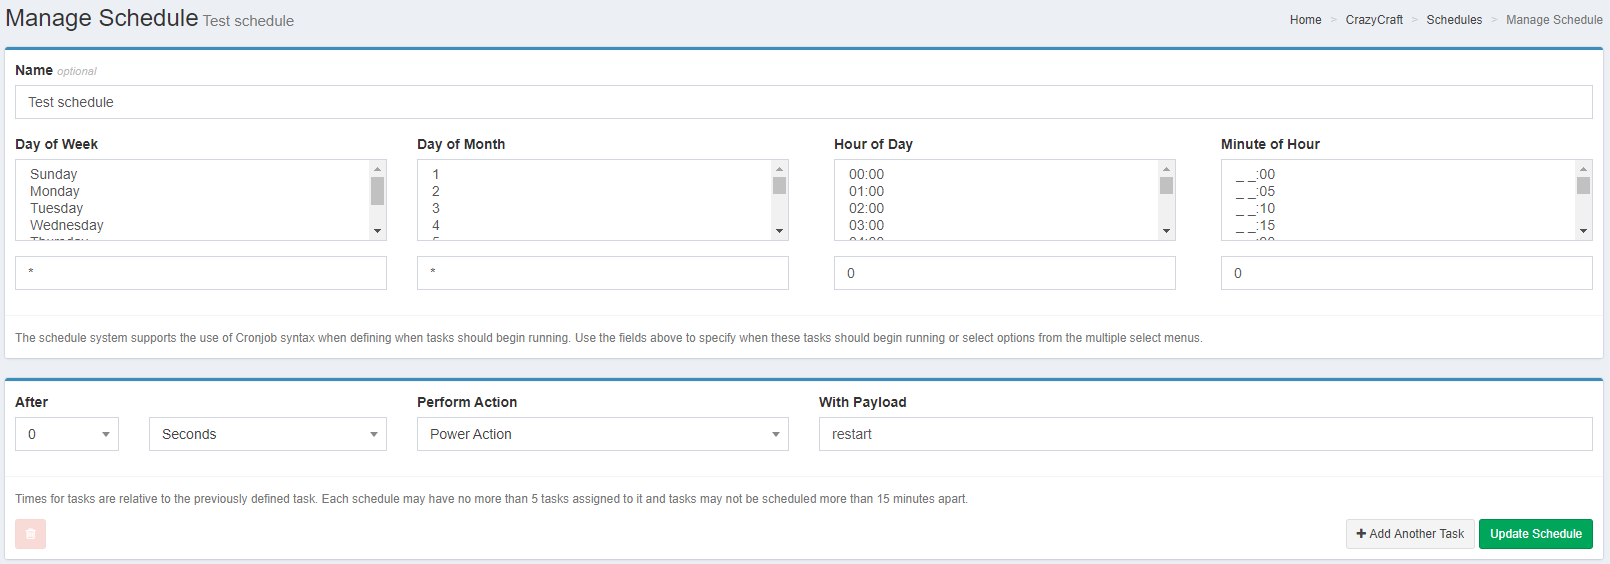
When Perform Action is changed to "Power Action", you can Start, Restart, Stop or Kill your server. Simply set your Payload to power action you want to be sent. Make sure to write them all in lowercase as follows - start, restart, stop, kill.
Examples
Send a message every hour
Restart server every day
Databases
Info
Databases are Patreon only feature.
You can request Databases in the support ticket on Discord server. Ticket can be opened with -new in #bot-commands channel.
Database from one server can be used on any other.
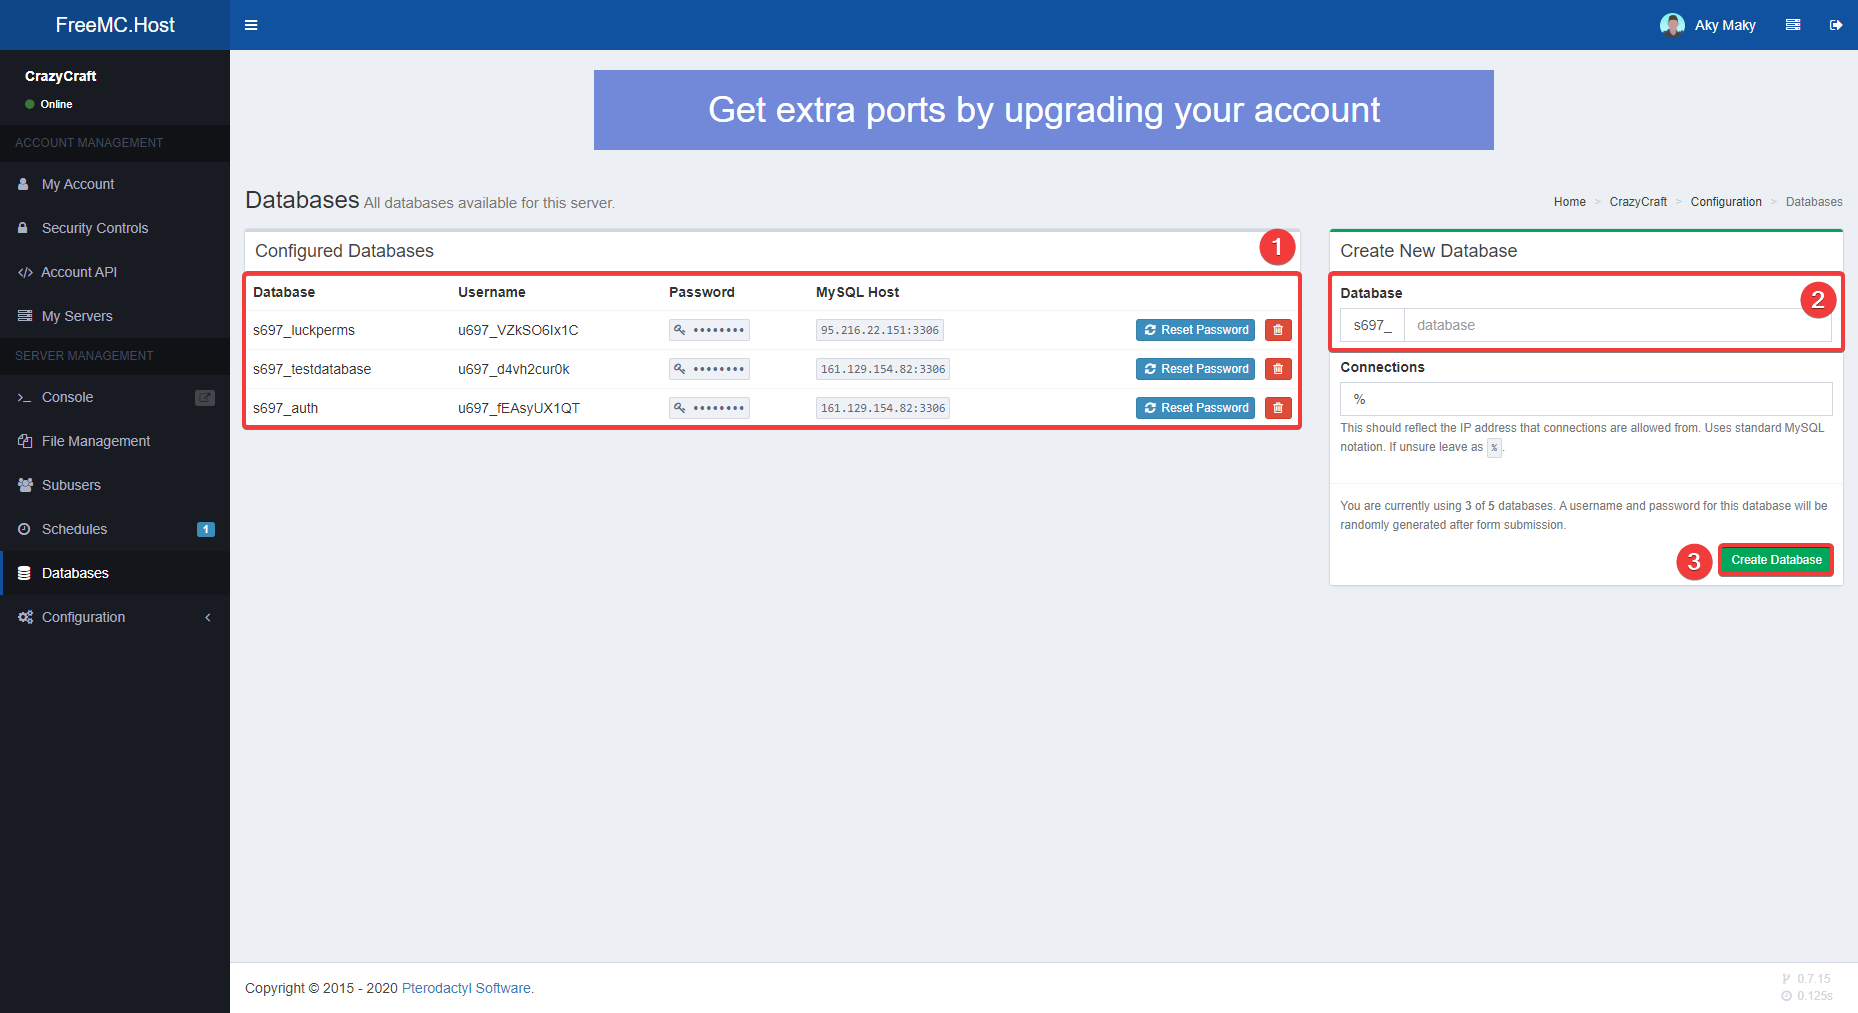
1 - Databases list.
2 - New Database name.
3 - Create new Database.
Clicking on "
••••••••" will reveal your Database's password.
Pro tip!
If you would like to manage your Database, Import or Export data, you can use phpMyAdmin by clicking here!
If your server is on Donator1, select donator1.freemc.host from "Server Choice".
For Donator2 select mysql.mcshosting.co.uk.
For Donator3 mysql2.mcshosting.co.uk.
Username and Password are the ones provided on the Database page of the Panel.
You can also use Database management programs like DBeaver, MySQL Workbench, DataGrip, Navicat, TablePlus, HeidiSQL, ...
Configuration
Server name
On this page, you can change the server's name that is displayed on the Panel.
This is not going to change anything on the Minecraft server itself.
Allocation settings
Here you can view all of the ports opened for your server. If you have more than one port, you can choose what one Minecraft server will run on by clicking Make Primary button. Green Primary button indicates that port is used for your Minecraft server.
Other ports can be used for services such as Votifier.
Info
Free servers are only limited to one port, the one Minecraft server is running on.
Patreons can requiest more ports for their servers in the support ticket on Discord server. Ticket can be opened with -new in #bot-commands channel.
SFTP Settings
Here you can see SFTP Connection settings for SFTP Clients.
SFTP Clients allow you faster Upload speeds and bypass 100MB upload limit. You can also Upload Folders. To learn more click here.
Startup Parameters
On this page, you can view the server's Startup command and modify startup variables.
This page currently has no use.
Changing variables won't reflect in any change.
Settings
Settings pages can be accessed from Sidebar on the left.
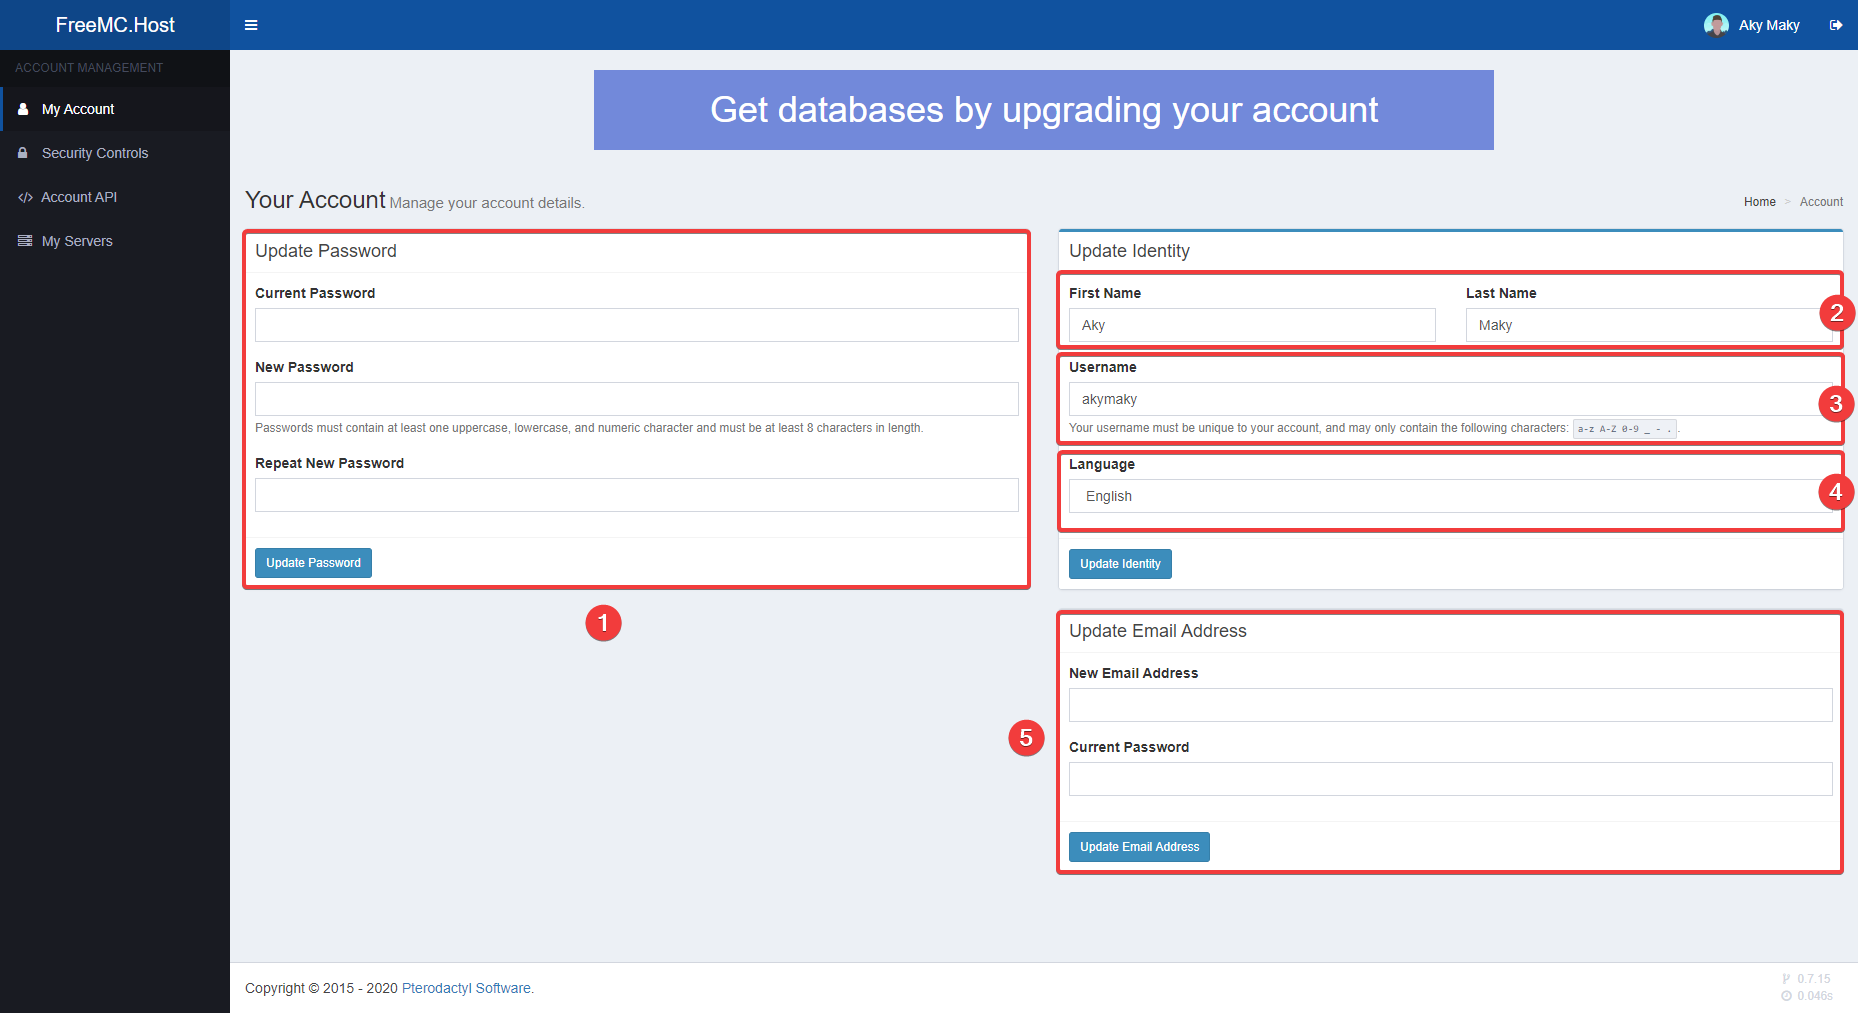
My Account
On My Account page, you can change your Password (1), Name (2), Username (3), Language of the Panel (4) and Update your Email Address (5).
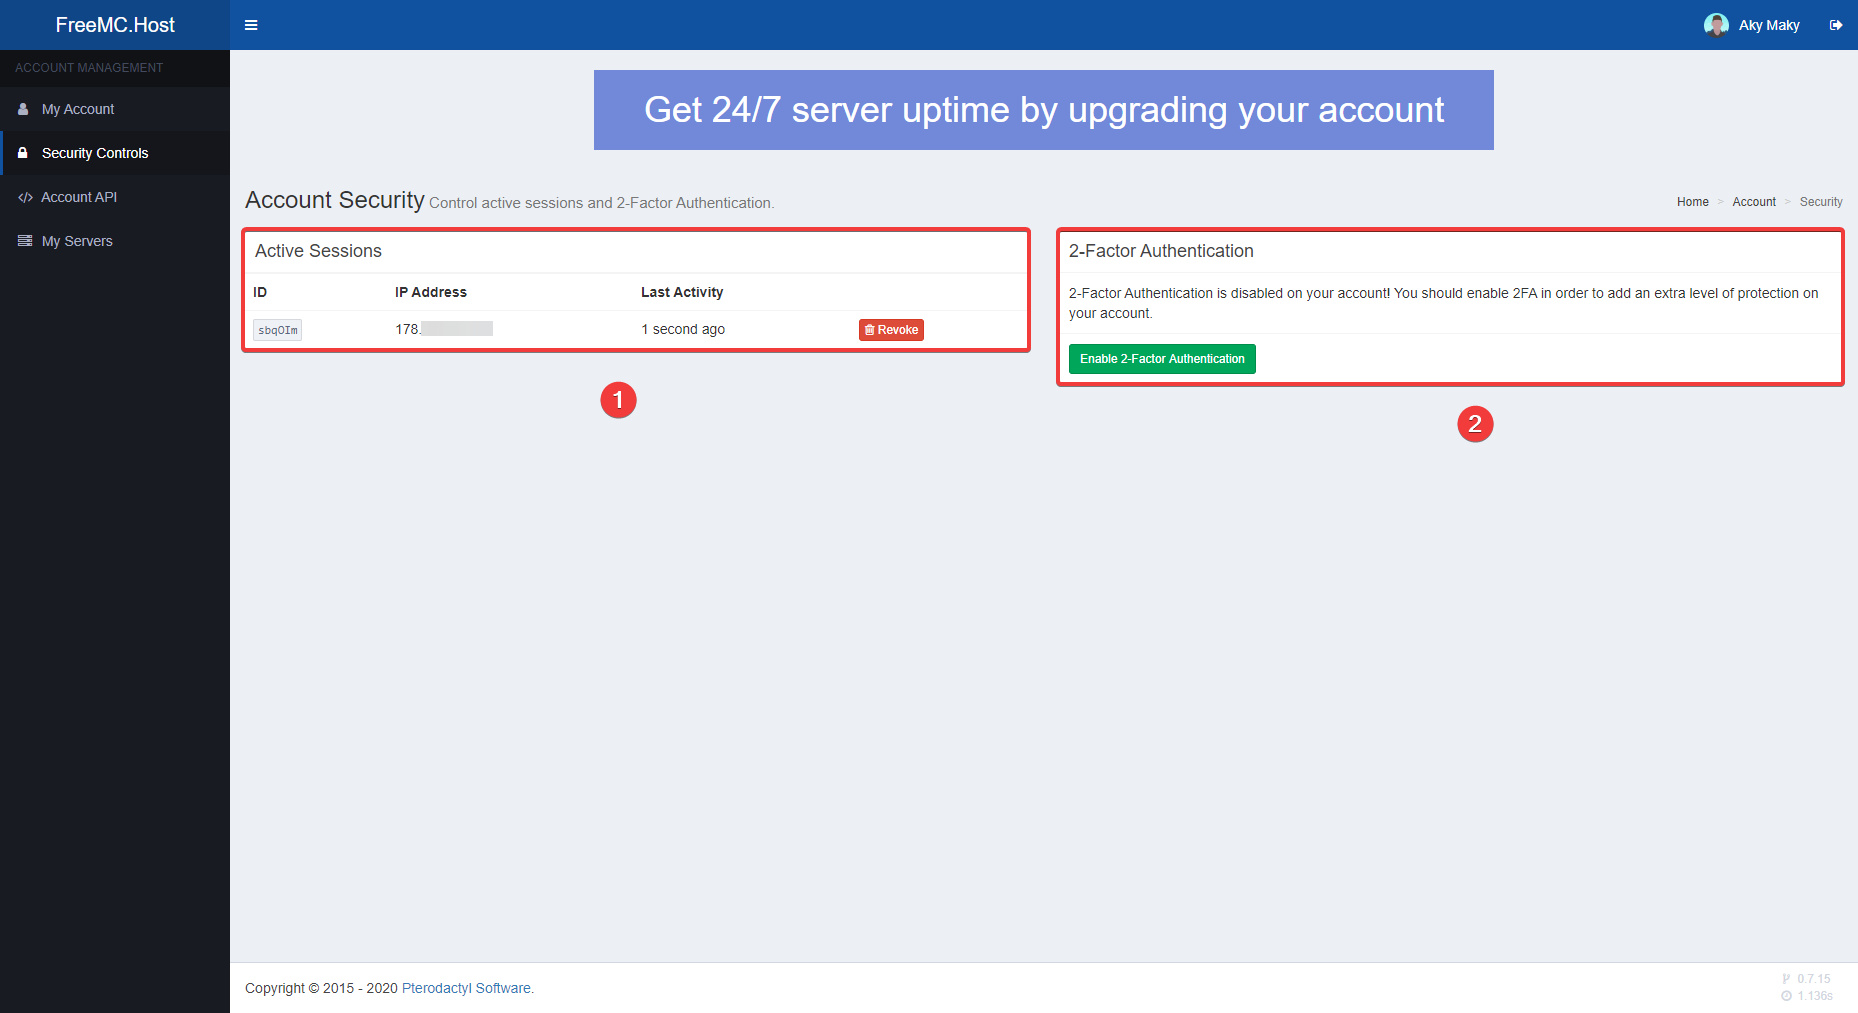
Security Controls
Here you can view all your Active session logins (1) and enable 2FA (Two Factor Authentication) on your account (2).
Caution
If you are unfamiliar with 2FA, do not enable it! Losing 2FA Code will lock you out of your account. Beware!
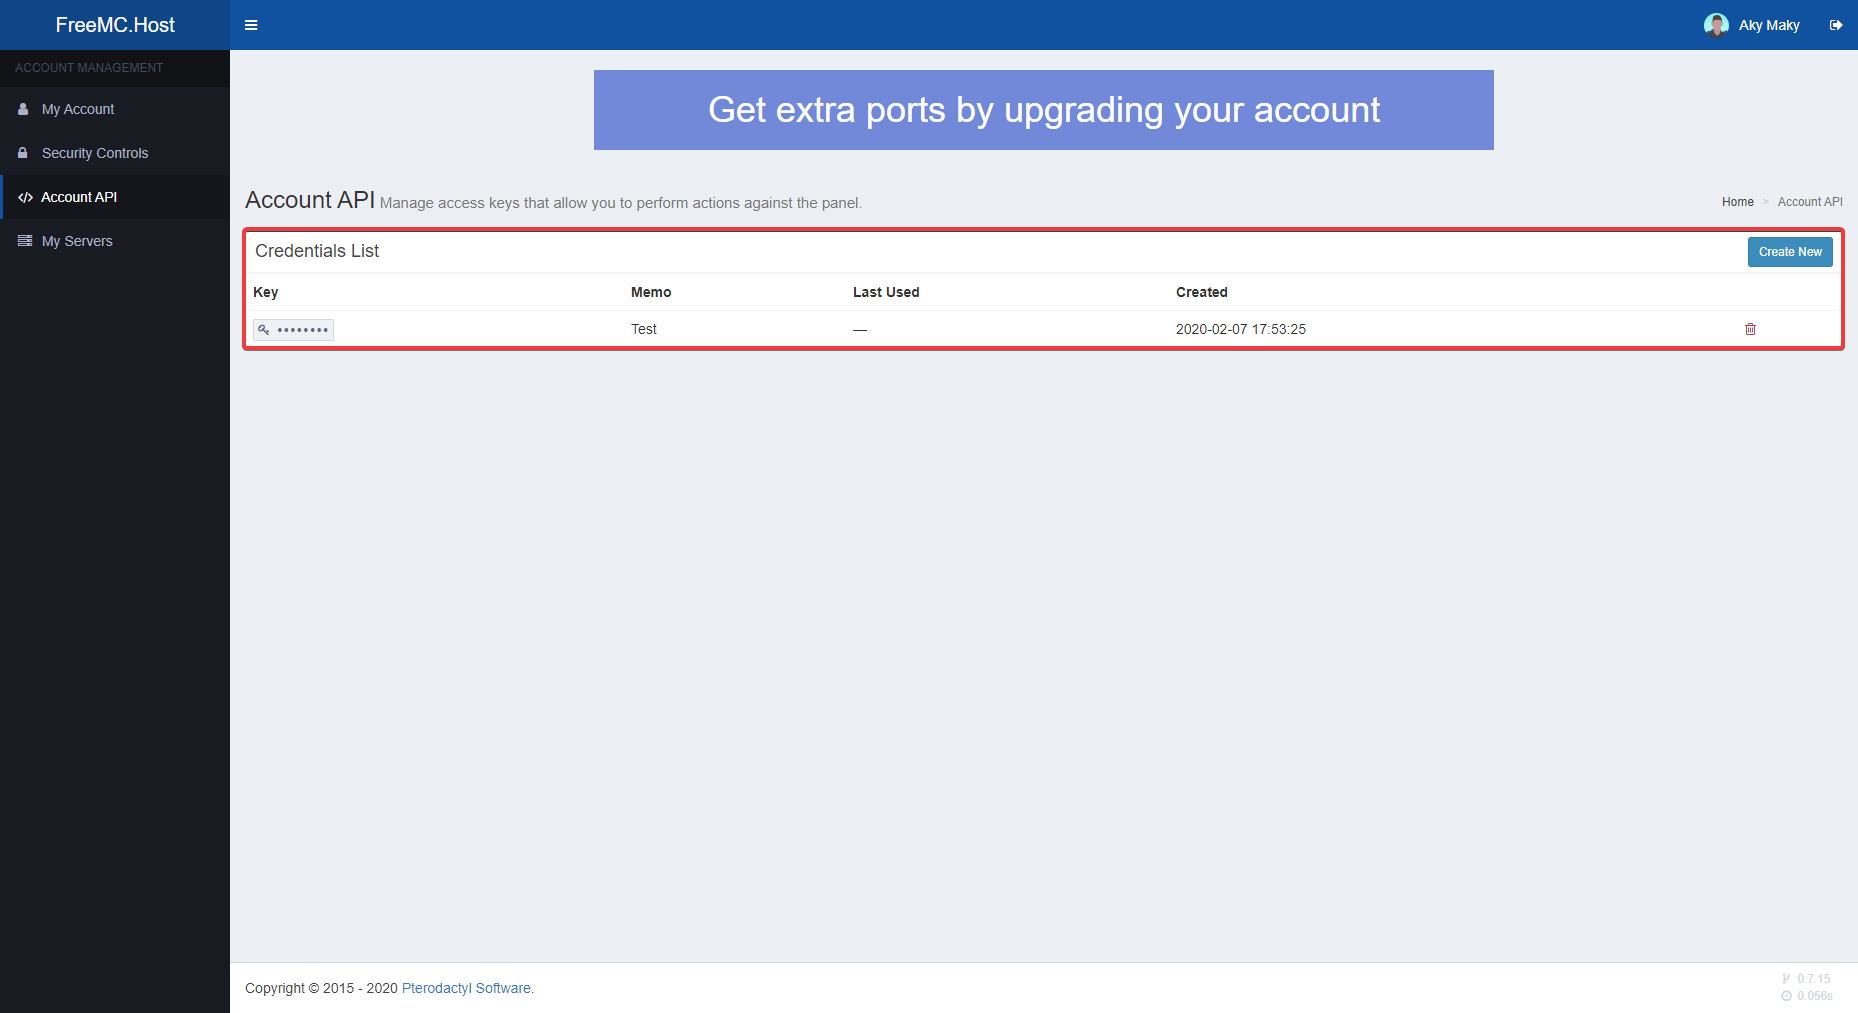
Account API
Danger
This is intended for advanced users only. Don't create API keys and share them if someone asked you to. This will grant them full access to your servers!
Make sure to keep API Keys private. Don't forget to properly utilize config files and .gitignore file in your project if publishing on GitHub!
On this page, you can view and create API Keys to Authenticate with Pterodactyl Client API. Clicking on " ••••••••" will reveal your API Key. If you are interested in all features Client API provides click here.